I see many perfume founders spend money fast because they start with a pretty idea and no production logic.
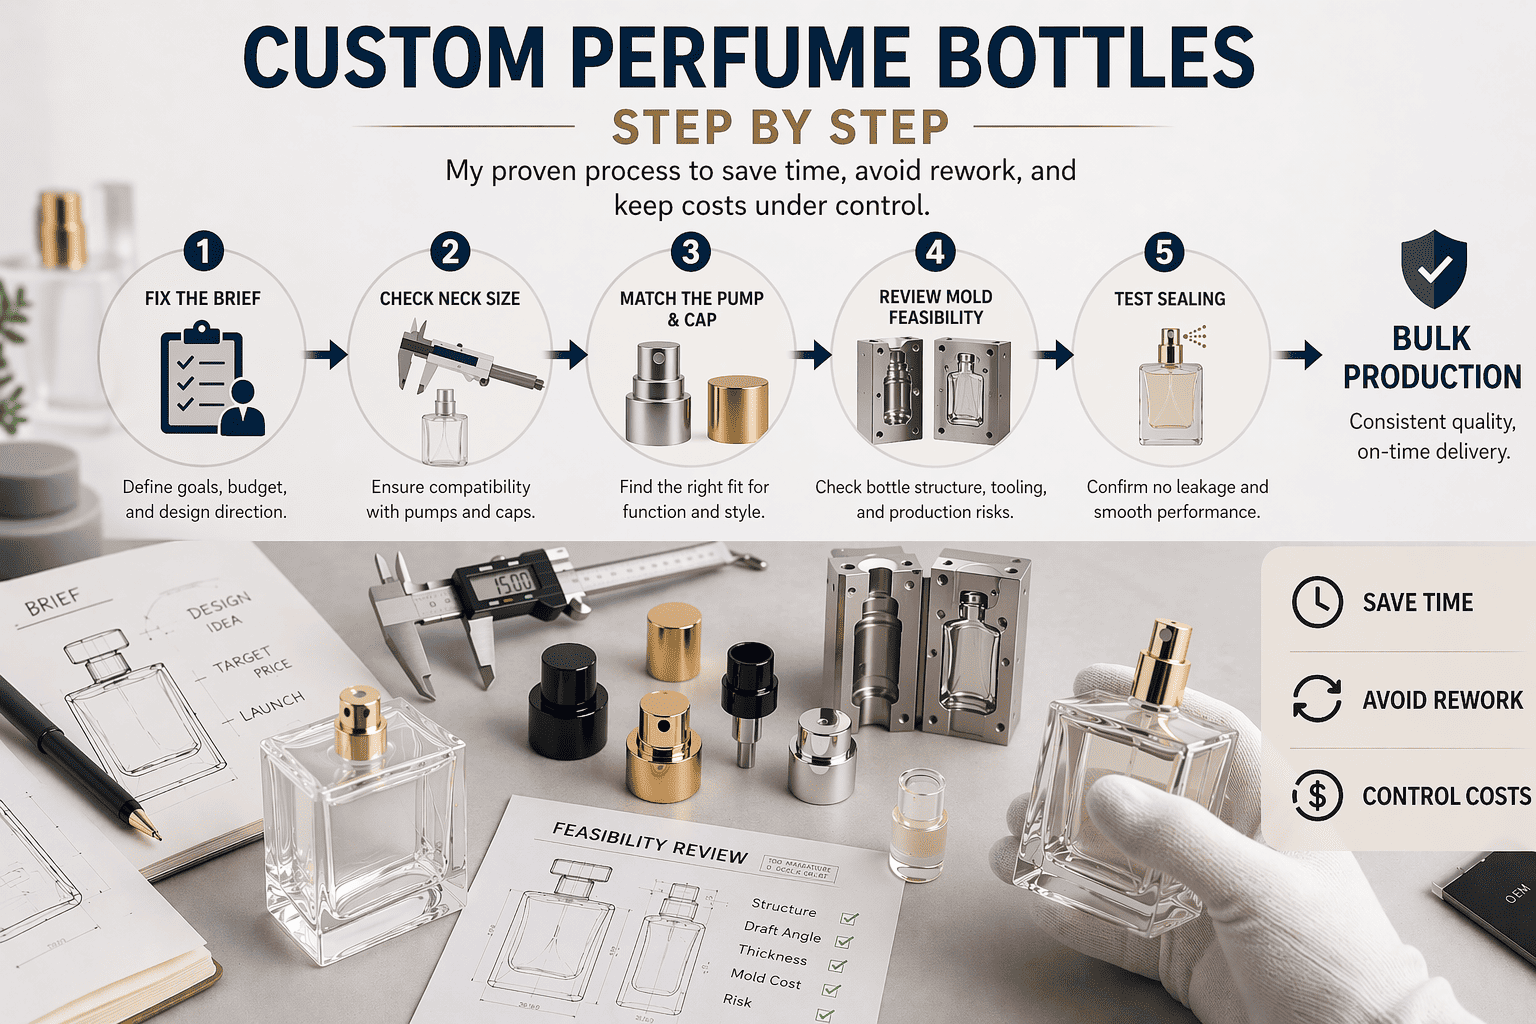
I custom a perfume bottle step by step by fixing the brief, checking neck size, matching the pump and cap, reviewing mold feasibility, and testing sealing before bulk production. This is how I save time, avoid rework, and keep costs under control.
I work with many small and growing perfume brands. Most of them care about brand story, shelf appeal, and budget. I understand that very well. But I also know one hard truth: a bottle that looks good on screen can still fail in real production. So in this guide, I share how I look at a project from both sides. I care about beauty, and I care about mass production. I do not separate those two things.
What Should I Prepare Before I Ask for a Perfume Bottle Quote?
I lose less money when I define the job before I contact any supplier.
I prepare the bottle size, target price, decoration idea, neck size, order quantity, and launch date before asking for a quote. A clear brief helps me get better prices, better advice, and fewer wrong samples.
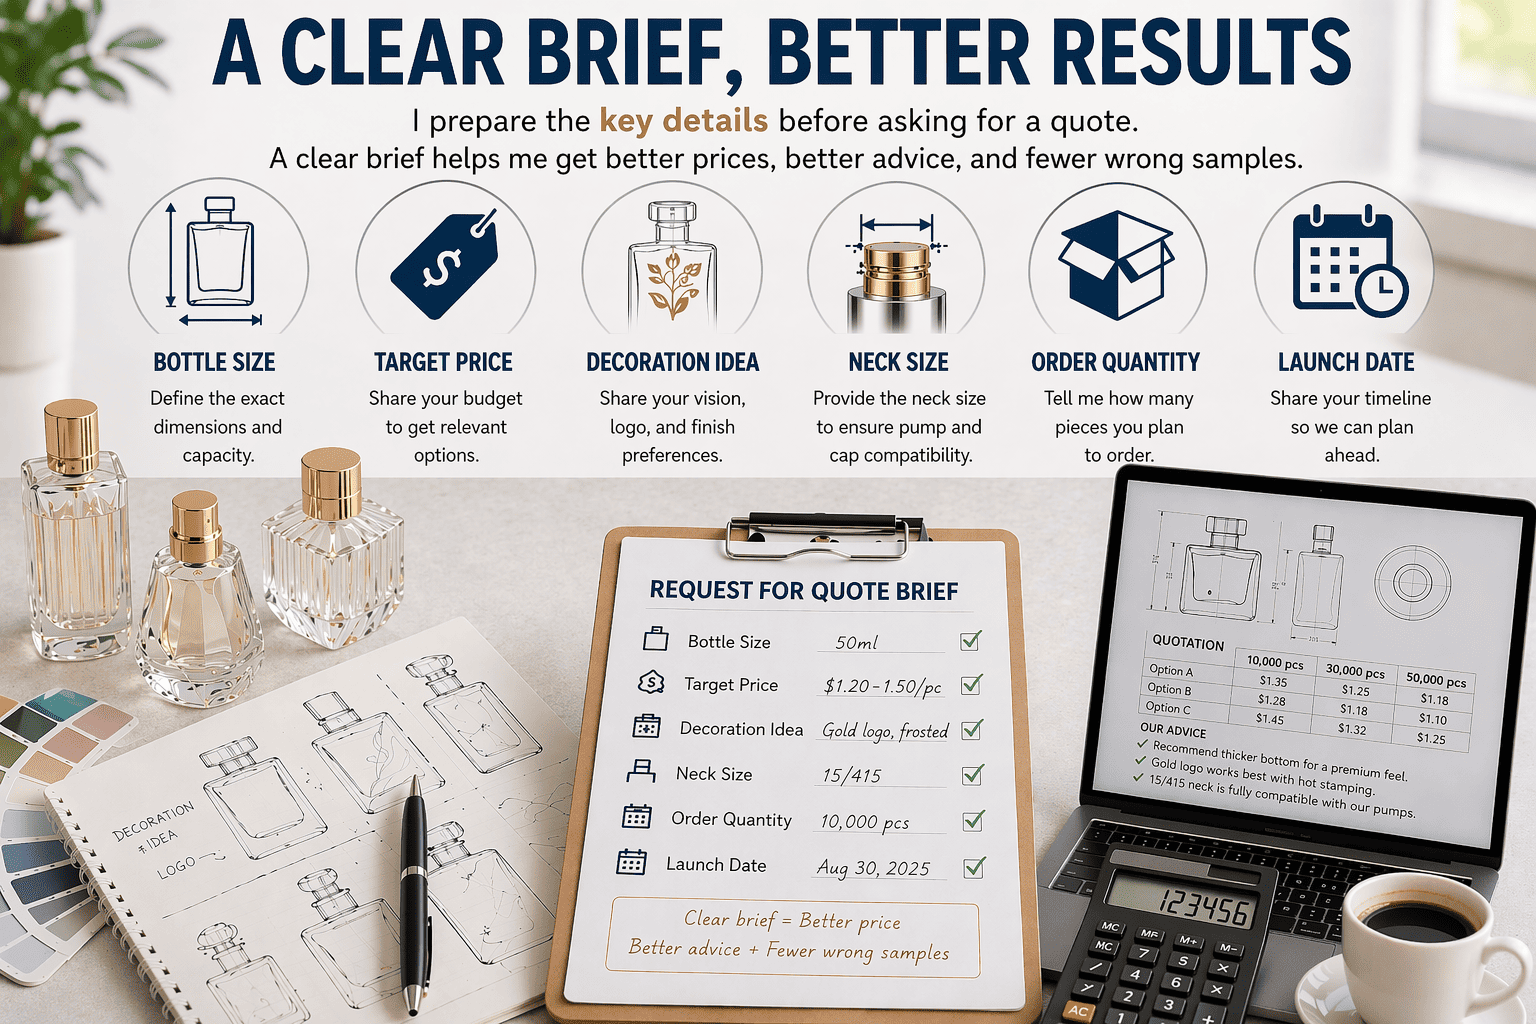
When I start a new bottle project, I do not begin with “Can you quote this?” I begin with “What exactly am I building?” That sounds basic, but many delays start here. A founder may send me a nice [[reference photo]][1], a mood board, or an AI image, but there is no bottle size, no quantity, no pump type, and no target delivery date. In that case, any quote is only a rough guess. That guess often leads to wasted time.
So I always build a simple sourcing brief first. I write down the bottle capacity, such as 30ml, 50ml, or 100ml. I list the neck specification if I already know it. I note the spray type, cap material, decoration method, filling style, and target market. I also write down the expected order quantity and the price range I need to stay within. I do not hide my budget goal. A useful supplier needs that information to guide me in a practical way.
I also define what matters most in this project. Do I need speed? Do I need a low MOQ? Do I need a unique shape? Do I need a premium heavy look? I cannot push every target at the same time. A very special custom mold, a low MOQ, fast delivery, and low cost usually do not belong together. I need to know what I am willing to trade.
| Item I define first | Why I define it early | What happens if I skip it |
|---|---|---|
| Bottle capacity | It affects mold, pump, box, and label area | I may approve the wrong structure |
| Order quantity | It affects MOQ and custom options | I may get useless pricing |
| Decoration plan | It changes cost and lead time | I may ask for an unrealistic finish |
| Launch date | It controls the whole schedule | I may miss the selling season |
| Budget range | It keeps the project practical | I may waste time on the wrong path |
This first step looks simple, but it saves me from confusion later. A clear brief is not boring. A clear brief is what makes the creative part possible.
Should I Choose a Stock Bottle or Open a New Mold?
I save cash and time when I choose the right path at the beginning.
I choose a stock bottle when I need faster launch, lower [[MOQ]][3], and lower risk. I choose a new mold when the bottle shape is part of the brand identity and the expected sales volume can support tooling cost.
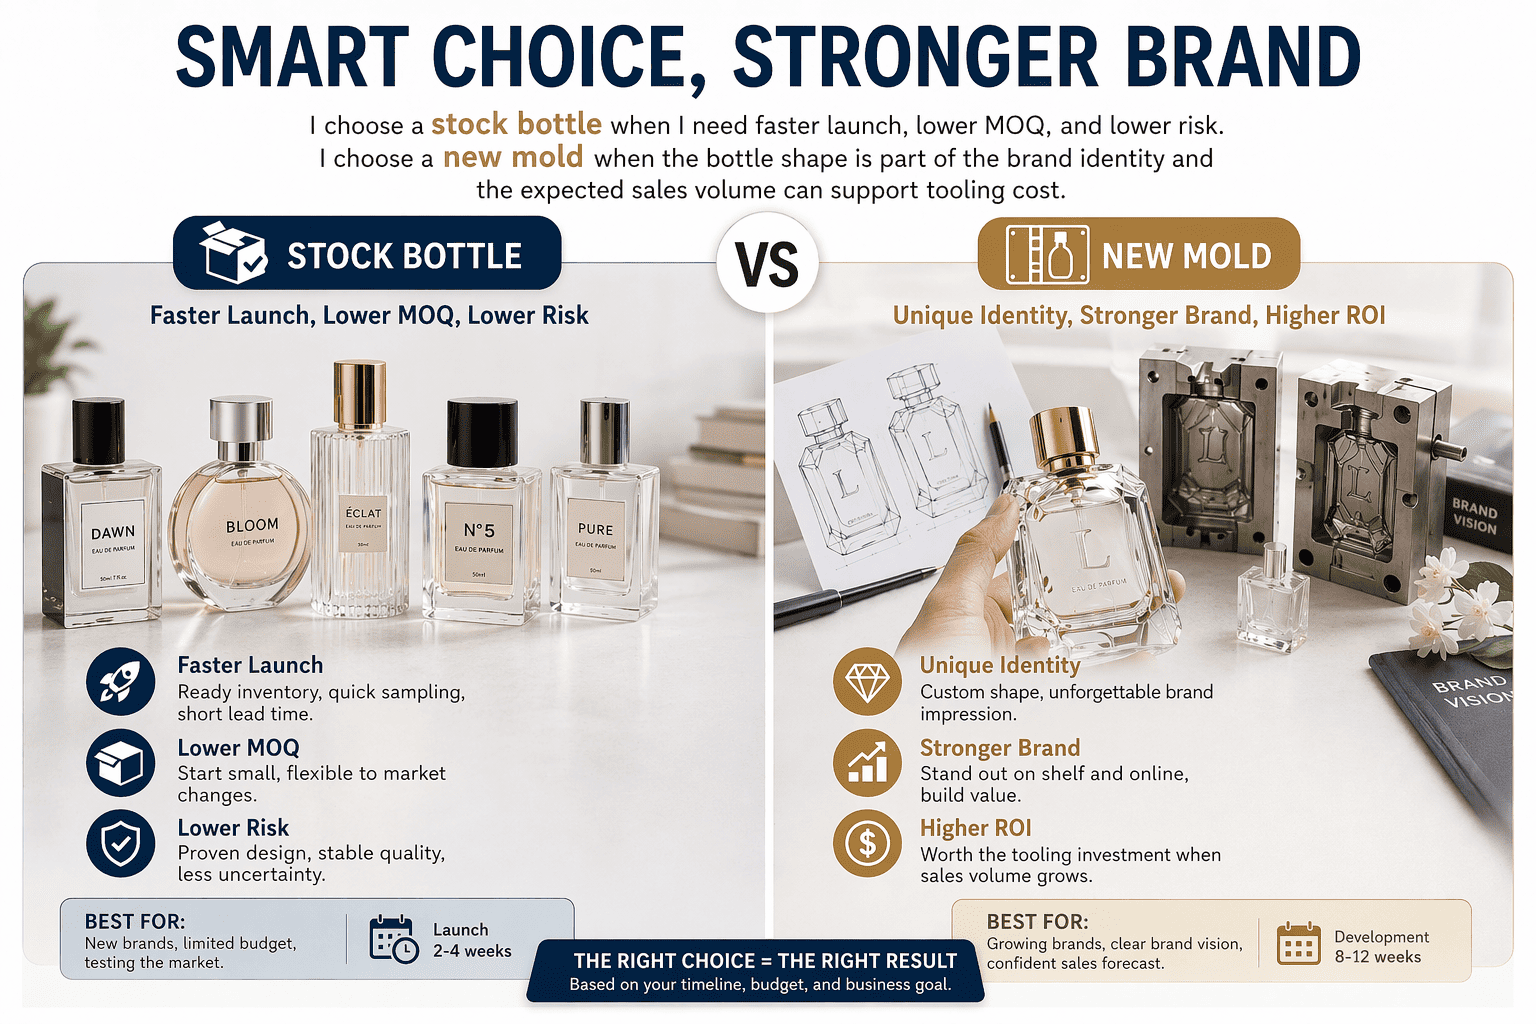
This is one of the most important decisions in the whole project. I do not treat it as only a design choice. I treat it as a business choice. A stock bottle gives me speed. It also gives me a safer cost structure. I can choose from many existing shapes and put my budget into decoration, cap, printing, and outer packaging. For many new perfume brands, this is the smartest first step.
A new mold gives me more freedom. I can build a bottle shape that belongs only to my brand. This can help the product stand out. It can also support a stronger premium position. But I need to be honest about what comes with that. A new mold means tooling cost, development time, sample revisions, technical review, and more production risk(moq: 10,000pcs ). It is not only about paying for the mold. It is about managing the whole path after that decision.
I often tell clients not to rush into “100% custom” too early. I understand why they want it. A custom shape feels exciting. But I have seen many brands spend too much money on tooling before they prove the market. Then they struggle with refill orders, accessories, and freight costs. So I often suggest a staged plan. First, use a good stock bottle with strong decoration. Then, after the brand grows, move into a custom mold. That path is often safer and smarter.
| Option | Best for me when | Main benefit | Main risk |
|---|---|---|---|
| Stock bottle | I need speed and low MOQ | Faster launch | Less unique shape |
| Stock bottle + custom decoration | I want balance | Better value | Design limits still exist |
| New mold | I need a signature bottle | Strong brand identity | Higher cost and longer lead time |
| Heavy glass bottle | I want a luxury feel | Better shelf impact | Higher production and freight cost |
I do not reject custom molds. I just want them to happen at the right time, with the right expectations, and with a clear plan for volume.
How Do I Match the 15 Neck, Spray Pump, and Cap Correctly?
I avoid many assembly problems when I explain neck matching clearly from the start.
When the industry says a 15 neck, it usually means the spray pump inner diameter is 15mm. The bottle itself will have a normal production tolerance. As long as the real size stays within the tolerance range, normal assembly will work. But the upper middle collar height on the spray pump must also match the cap height.
This is a point many clients overlook, so I always explain it clearly. In our industry, when people talk about a 15 neck, they usually mean the spray pump inner diameter is 15mm. That does not mean every bottle mouth will measure exactly the same number with zero difference. Glass has a normal production tolerance. That is part of manufacturing. So I do not panic when I see a small variation. As long as the value stays within the acceptable tolerance range, the bottle and spray pump can still assemble normally.
But neck size alone is not enough. This is where many problems begin. I also need to check the upper middle collar height on the spray assembly. That height must match the cap height. If the collar height is wrong, the cap may sit too high, too low, or not close in a stable way. Then the product may look bad, feel loose, or create assembly stress. Many people focus only on the neck diameter and ignore this height relationship. I never ignore it.
When I review a full set, I look at the glass bottle, spray pump, inner insert, collar, and cap as one system. I do not approve them one by one. Even if every single part looks fine alone, the final set can still fail if the dimensions do not match.
| Part | What I check | Why it matters |
|---|---|---|
| 15 neck size | Inner diameter and tolerance range | It affects spray pump assembly |
| [[Bottle mouth finish]][2] | Shape and consistency | It affects sealing and fit |
| Spray pump collar height | Height above the neck area | It affects cap matching |
| Cap inner height | Real usable height inside the cap | It affects closure and appearance |
| Full assembly | Pump, insert, cap, and bottle together | It shows if the set works in real use |
I always remind clients that packaging is not a flat design job. It is a dimensional system. A small mismatch in height can become a big problem after mass production. So I check the numbers early, and I check the actual assembled sample before approval.
Can an AI Perfume Bottle Design Really Go Into Mass Production?
I like creative bottle ideas, but I never trust beauty alone.
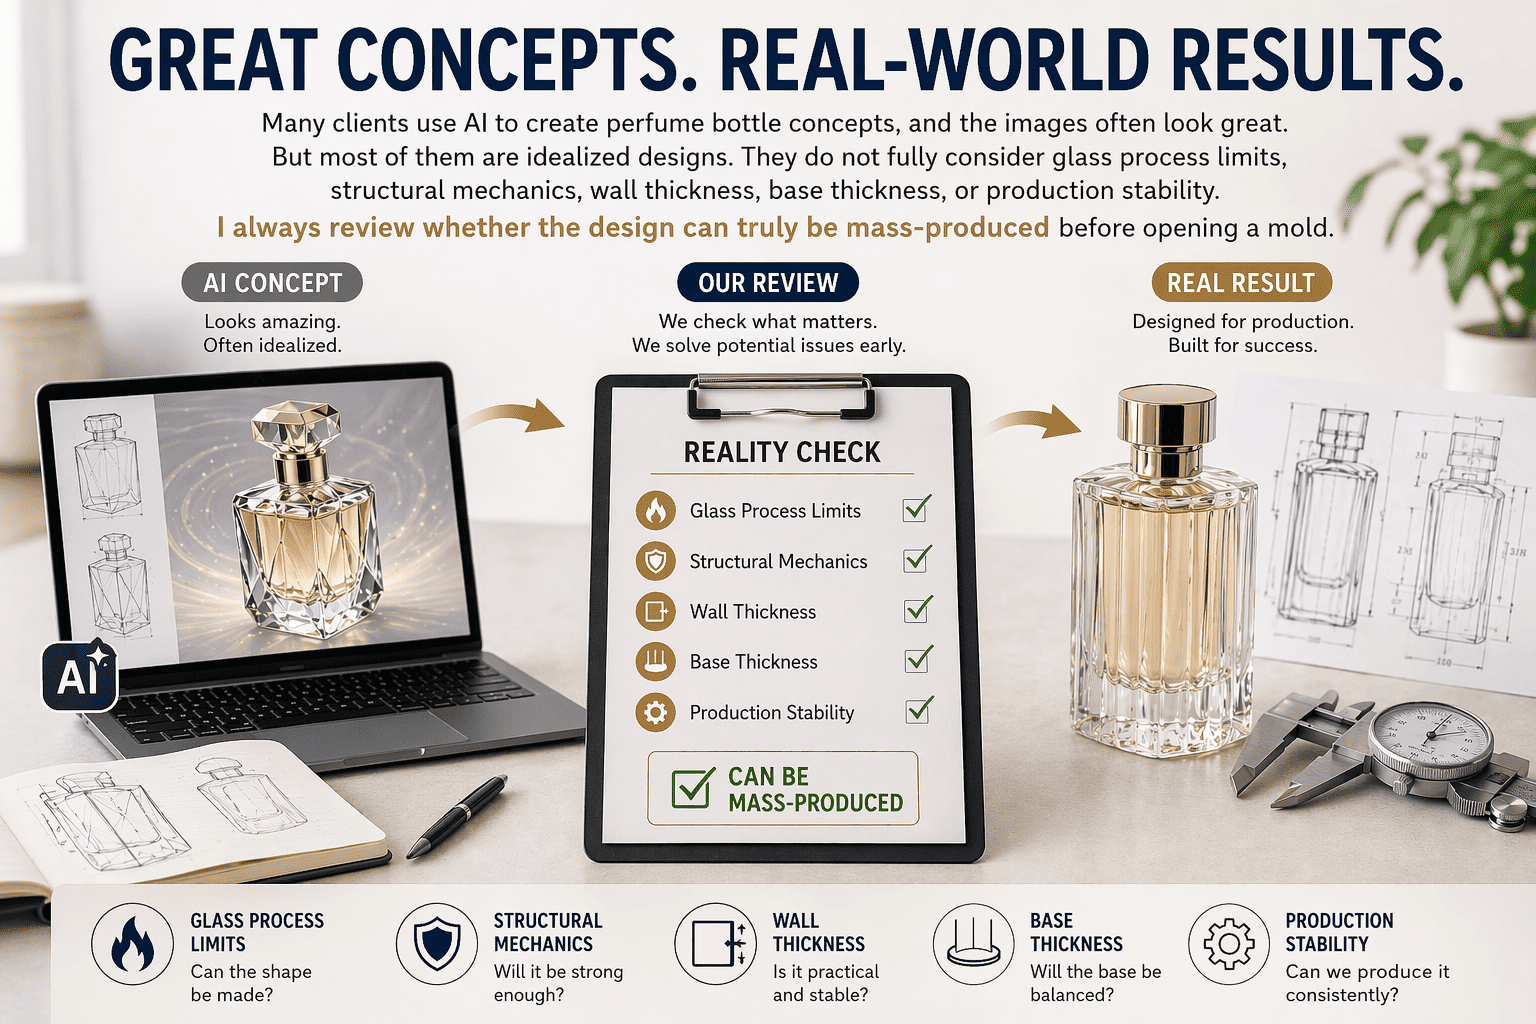
Many clients use AI to create perfume bottle concepts, and the images often look great. But most of them are idealized designs. They do not fully consider glass process limits, structural mechanics, wall thickness, base thickness, or production stability. I always review whether the design can truly be mass-produced before opening a mold.

I see more and more clients bring me AI-generated bottle concepts. I understand why. The images are fast, fresh, and inspiring. Some of them look amazing. But I also need to say this clearly: many AI bottle concepts are still idealized designs. They look good in a picture, but they do not fully respect how glass behaves in real mold production.
That is why, when I work with a client on a new mold project, I always connect the design review with the factory technical team. I do not only ask, “Is this beautiful?” I ask, “Can this be formed, cooled, assembled, and mass-produced in a stable way?” That is a very different question.
Here are two common examples. First, if the bottle body curve is too round and does not follow a stable force structure, the finished bottle may not stand well. The flatness can be poor, and the bottle may wobble on a table. A shape can look soft and elegant in a rendering, but in real life it still needs a stable standing surface and a reasonable center of gravity.
Second, many clients love a thick glass base. I understand that too. A heavy base gives a premium feeling and better visual weight. But it also creates a real process challenge. If the bottom is very thick while the inner wall is relatively thin, the glass in the mold will not cool in the same way across the whole bottle. The bottle may need a longer cooling time in the mold. If that cooling control is not right, the risk of body cracks or even self-breakage becomes much higher. Then the yield rate drops, and the production cost goes up.
So for every creative bottle, I ask the factory technical department to check key parameters before we move ahead. I review shoulder height, base thickness, body wall thickness, standing stability, and assembly space. I want a bottle that looks beautiful, but I also want a bottle that can survive real production, real packing, and real transport.
| Design point | Risk if ignored | What I review first |
|---|---|---|
| Overly round body curve | Bottle may stand poorly | Standing stability and base contact |
| Very thick base | Cracks, self-breakage, low yield | Cooling logic and glass distribution |
| Thin wall with heavy bottom | Uneven melting and cooling | Wall thickness balance |
| Extreme shoulder shape | Assembly and mold difficulty | Shoulder height and structure |
| Decorative grooves or patterns | Hard to form cleanly in bulk | Mold feasibility and defect risk |
This is where I add real value. I help clients move from a beautiful idea to a manufacturable bottle. I want to reduce rework before tooling starts. That saves money, and it saves time.
How Do I Test Sealing, Leakage, and Finished Bottle Safety Before Shipment?
I do not trust a bottle set until I test the assembled product.
After I assemble the bottle, spray pump, inner insert, and cap, I test for leakage, sealing, and pressure resistance in use. Many people casually call this a vacuum test. In daily industry speech, people also call the machine a vacuum machine. That is fine. But the more correct machine name for finished perfume pack leakage testing is a vacuum sealing tester.
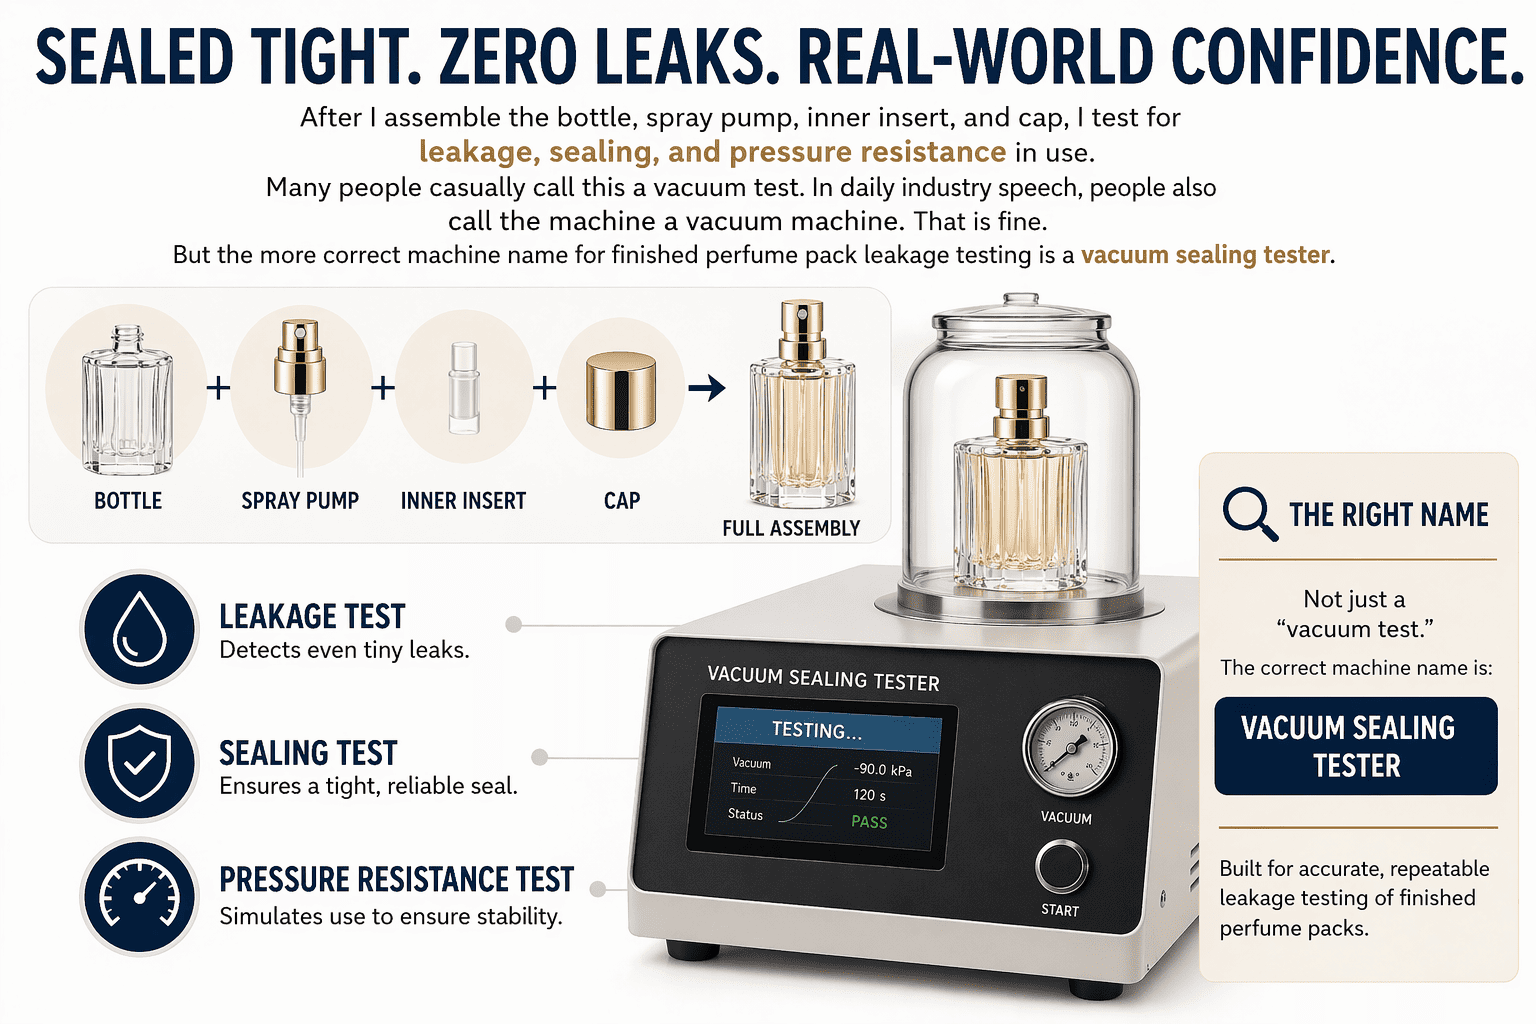
This is a point I always explain to clients, especially before shipment. Once the glass bottle is assembled with the spray pump, inner insert, and cap, I need to test whether the set leaks, whether the seal is stable, and whether it can handle pressure changes. This is not only about the bottle itself. It is about the whole finished package.
In daily industry talk, many people simply call this a “vacuum test,” and many people call the machine a “vacuum machine.” That everyday wording is common and completely understood. But if I want to describe the equipment more correctly, the right name is a vacuum sealing tester. Its job is to test sealing performance and leakage risk in the finished assembled package.
The test logic is practical. I place the complete package set into a vacuum chamber. That includes the bottle, liquid, spray pump, and inner insert. Then the machine creates negative pressure to simulate changes that may happen during transport, altitude shifts, or temperature difference. I observe whether bubbles appear around the neck finish or whether liquid leaks out. This is a must for perfume packaging because perfume liquid is volatile and sensitive to sealing problems.
I also make an important distinction here. This is not the same as a burst pressure machine that tests the bottle wall itself for internal pressure resistance. That type of test is rarely used in our daily perfume packaging work. For finished product leakage and sealing after assembly, what we use in practice is the vacuum sealing tester. In normal workshop speech, calling it the vacuum machine is also fine. I just want clients to understand the difference, so they do not use the wrong term in a technical conversation.
| Test item | What I test | Why I test it |
|---|---|---|
| Sealing performance | Whether the assembled set stays closed | It protects product quality |
| Leakage at neck area | Whether bubbles or liquid appear | It helps me find weak assembly points |
| Pressure change response | How the package reacts under negative pressure | It simulates transport risk |
| Finished set integrity | Bottle, liquid, pump, insert together | It checks the real sold product |
| Terminology accuracy | Vacuum sealing tester vs burst pressure machine | It helps me communicate correctly |
I do not skip this stage. A bottle that looks perfect is not enough. If it leaks after filling, all the beauty loses value. So I always test the full package as a complete system before bulk shipment.
Conclusion
I save my clients money when I balance design, structure, assembly, and testing before mass production begins.