
Transferring perfume looks simple, but the wrong method can waste fragrance, damage the pump, or leave perfume leaking inside a bag.
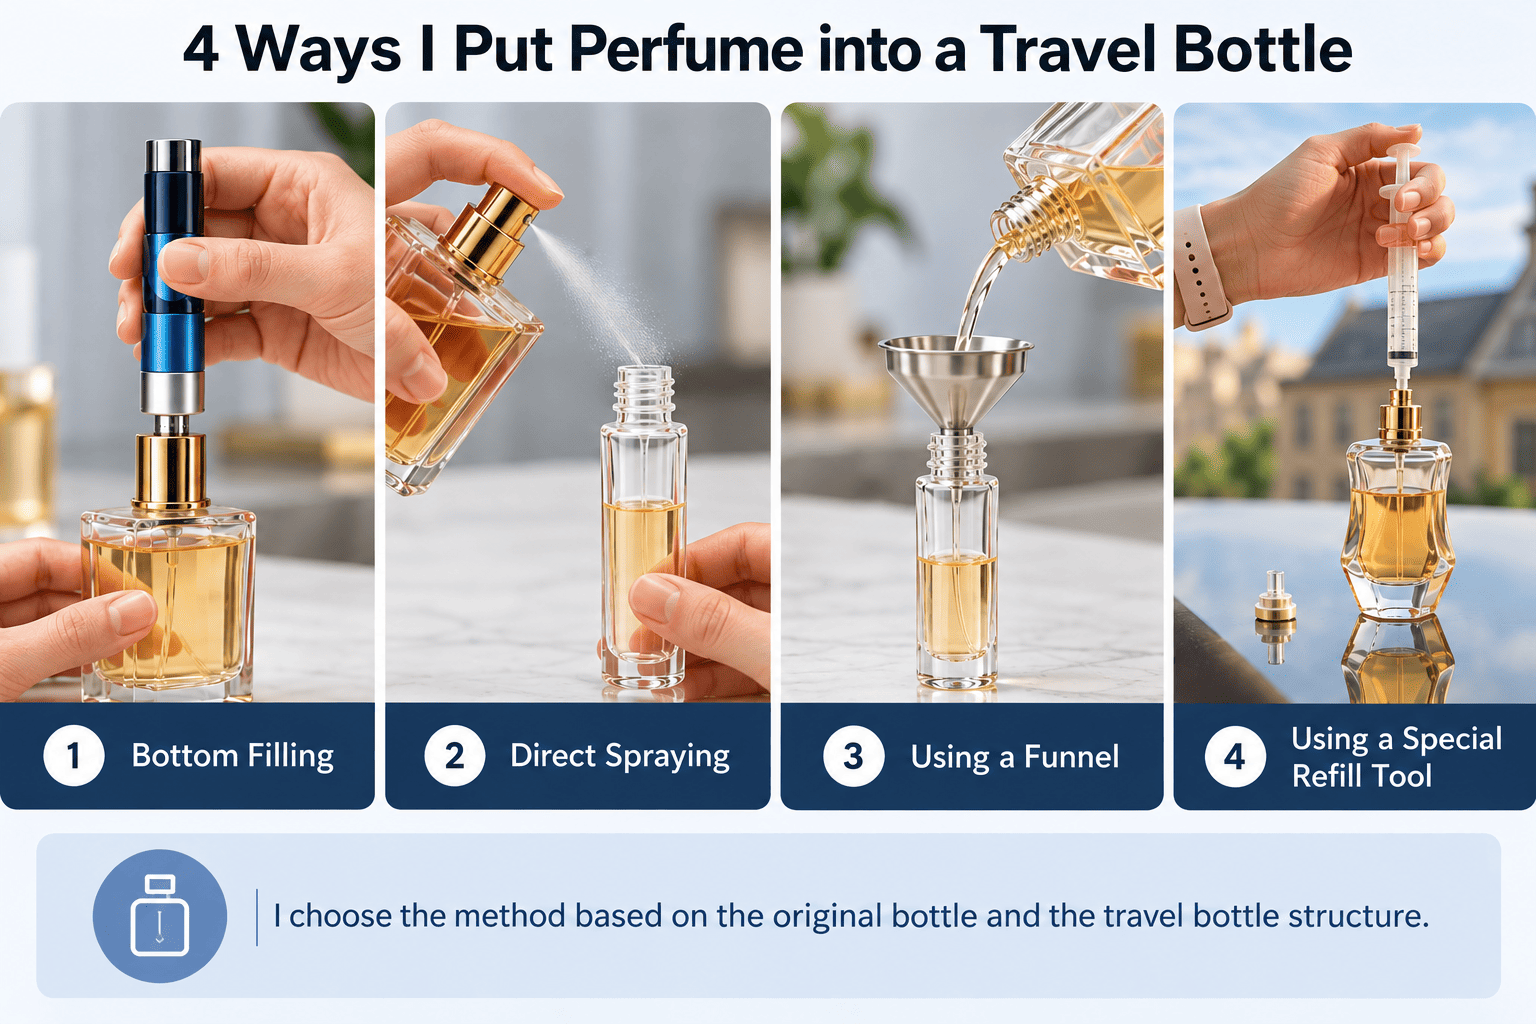
I put perfume into a travel bottle in four main ways: bottom filling, direct spraying, using a funnel, or using a special refill tool. I choose the method based on the original bottle and the travel bottle structure.
I work with perfume glass bottles, pumps, caps, and packaging every day. I have seen many bottle structures, and I know that one transfer method cannot work for every perfume bottle.
I first look at the original perfume bottle. Then I check the travel bottle. When I understand both structures, I can choose a safer and cleaner filling method.
How Do I Fill a Bottom-Fill Travel Perfume Bottle?
A bottom-fill atomizer is easy to use, but it only works when the original perfume bottle has a compatible spray pump stem.
I fill a bottom-fill travel bottle by removing the original spray button, placing the bottom valve over the exposed pump stem, and pressing the atomizer up and down until it contains enough perfume.
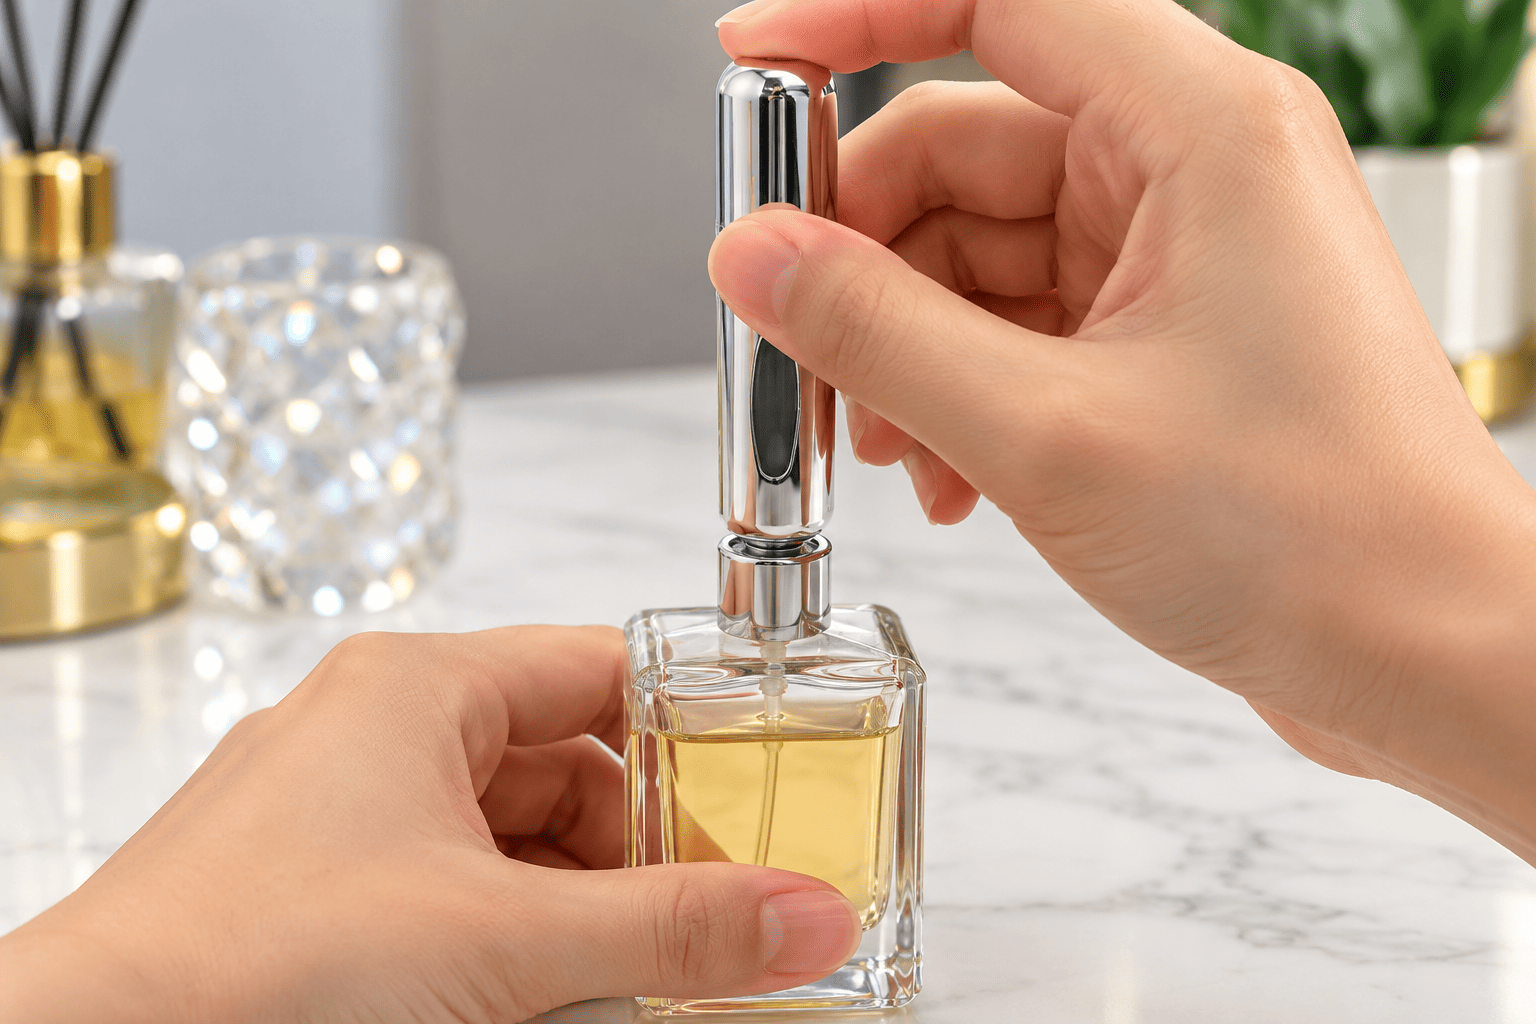
How I Use a Bottom-Fill Perfume Atomizer
I start by putting the original perfume bottle on a flat surface.
I remove the spray button from the top of the perfume bottle. I normally pull it straight upward. I do not twist it too hard because I do not want to damage the pump stem.
After I remove the button, I can usually see a small plastic or metal stem.
I place the filling valve at the bottom of the travel atomizer directly over this stem.
Then I press the travel bottle downward.
Each press pushes a small amount of perfume into the travel atomizer.
I continue until the bottle is around 80% to 90% full. I do not fill it completely because I prefer to leave a small amount of air space.
| Step | What I Do | What I Check |
|---|---|---|
| 1 | Remove the spray button | I avoid damaging the pump |
| 2 | Find the exposed pump stem | I make sure it is clean |
| 3 | Place the bottom valve over the stem | I check the alignment |
| 4 | Press the atomizer up and down | I watch the perfume level |
| 5 | Stop before the bottle is completely full | I leave some air space |
| 6 | Test the atomizer | I check the spray and seal |
I like this method because I do not need a funnel, syringe, or other filling tool.
The transfer can also be very clean when the two parts fit correctly.
I think this method is useful for personal travel bottles. A customer can fill a small atomizer before a trip without opening the original perfume bottle.
However, I do not assume every spray stem has the same size.
Different perfume pumps can use different stem diameters and different structures. A bottom-fill atomizer may fit one perfume bottle but not another.
I never force the bottom valve onto the pump stem.
If the connection does not feel correct, I stop and use another method.
Why I Check the Bottom Valve Carefully
I pay close attention to the bottom valve because it is part of the sealing system.
A low-quality valve may allow perfume to slowly escape after filling.
I also avoid overfilling the atomizer. If the bottle is completely full, temperature and pressure changes can increase the chance of leakage.
For a perfume brand, I think testing is very important. I do not judge a travel atomizer only by its appearance.
I test the filling valve, spray pump, spray pattern, sealing, and leakage before I recommend it for production.
How Do I Transfer Perfume by Spraying It Into a Travel Bottle?
Direct spraying is one of the simplest methods when the travel bottle can be opened and the bottle neck is wide enough.
I transfer perfume by spraying it directly into an open travel bottle. I keep the original spray nozzle close to the opening and use slow, controlled sprays to reduce fragrance loss.
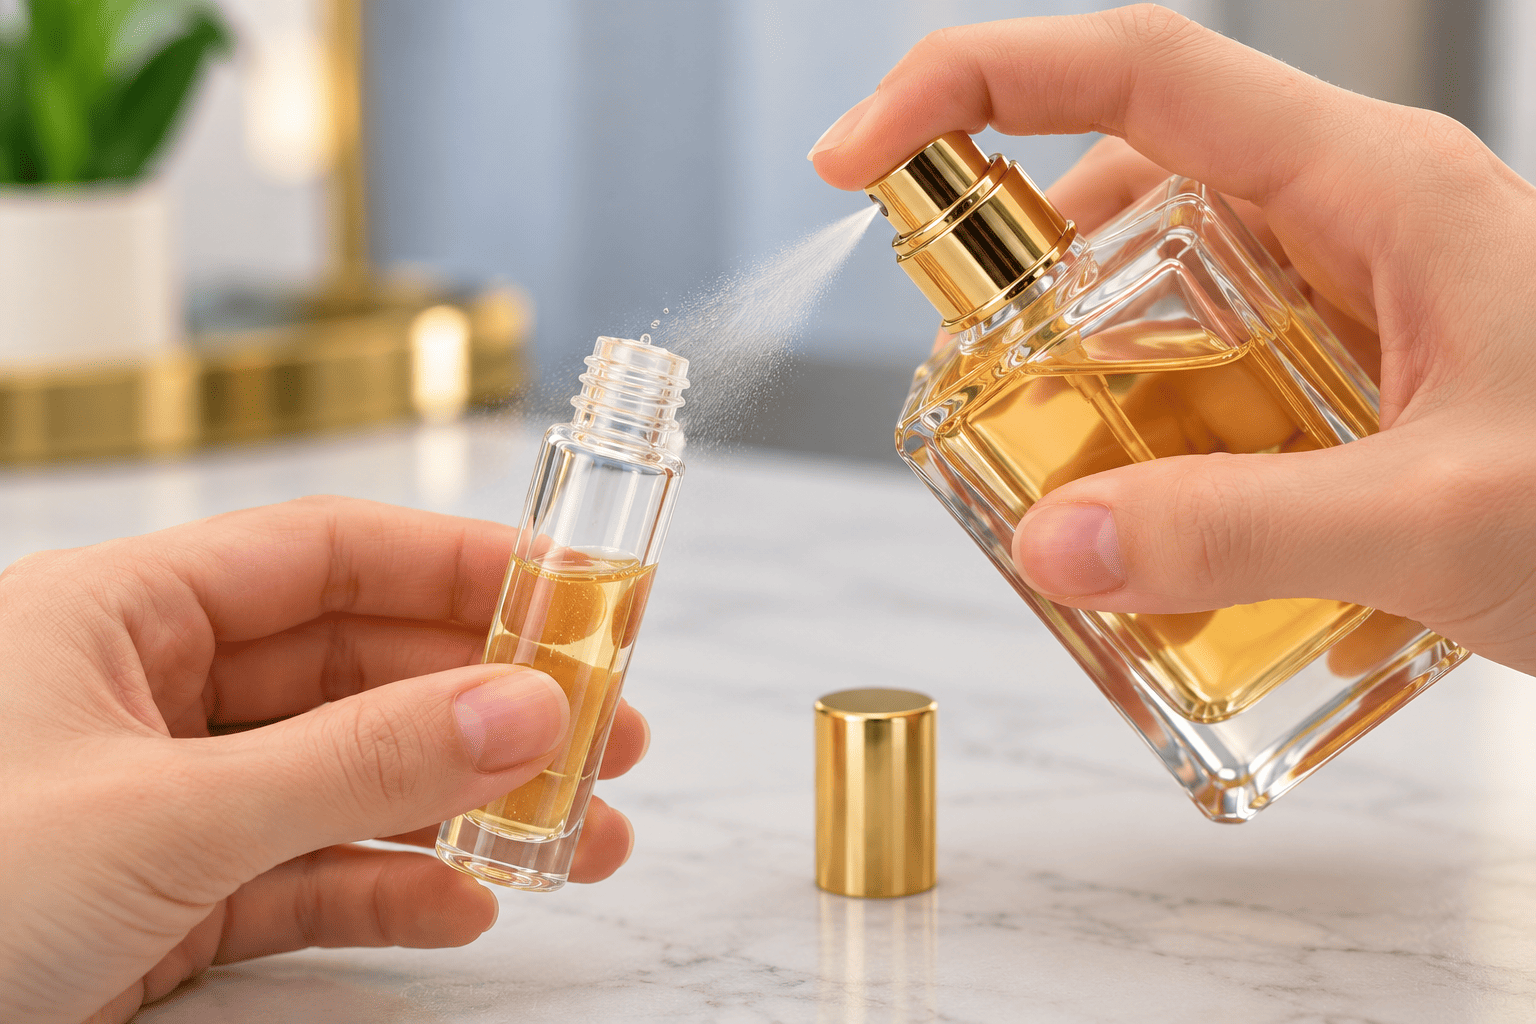
How I Use the Direct Spray Method
I first remove the pump or cap from the travel bottle.
I place the travel bottle on a stable table.
Then I move the original perfume spray nozzle close to the opening of the travel bottle.
I spray slowly.
I do not spray from a long distance because part of the perfume can spread into the air.
I also avoid pressing the pump too quickly. A strong spray can hit the edge of the bottle opening and splash back.
I prefer short and controlled sprays.
This method works well when I only need a small amount of perfume.
| Factor | Direct Spray Method |
|---|---|
| Extra tools | Not required |
| Difficulty | Easy |
| Transfer speed | Medium |
| Perfume loss | Medium |
| Spill risk | Medium |
| Best use | Small amounts |
| Bottle requirement | Open or removable top |
I think the main advantage is convenience.
I do not need any extra tool, and I can start immediately.
The main disadvantage is perfume loss.
Some fragrance usually stays in the air or around the bottle opening.
This is not a serious problem when I only transfer a few milliliters. It becomes more noticeable when I need to transfer a larger amount.
How I Reduce Perfume Waste
I keep the original spray nozzle very close to the bottle opening.
I also work in a place without strong airflow.
I place a clean tissue or cloth under the bottles in case a small amount of perfume spills.
I also keep the filling area away from candles, cigarettes, flames, heaters, and other ignition sources.
Perfume usually contains a high percentage of alcohol. I always treat it as a flammable liquid.
I also make sure the travel bottle is clean before I start.
If the bottle previously contained another fragrance, I do not fill it immediately.
Old perfume can remain inside the bottle and inside the spray pump. This residue can change the smell of the new fragrance.
I clean the bottle first when I change scents.
When I Choose Direct Spraying
I choose this method when the travel bottle has a removable pump and I only need a small quantity.
I also use it when I do not have a funnel or another transfer tool.
However, I do not usually choose direct spraying for expensive perfume when I want to transfer a large amount.
The perfume loss may be small with every spray, but it adds up after many sprays.
In that case, I prefer a funnel, filling adapter, or another controlled transfer method.
How Do I Put Perfume in a Travel Bottle With a Funnel?
A small funnel works well when the travel bottle can be opened and the original perfume can be poured safely.
I fill a travel perfume bottle with a funnel by placing a small clean funnel inside the opening and pouring the perfume slowly. This method works best with screw-neck or refillable bottles that can be opened.
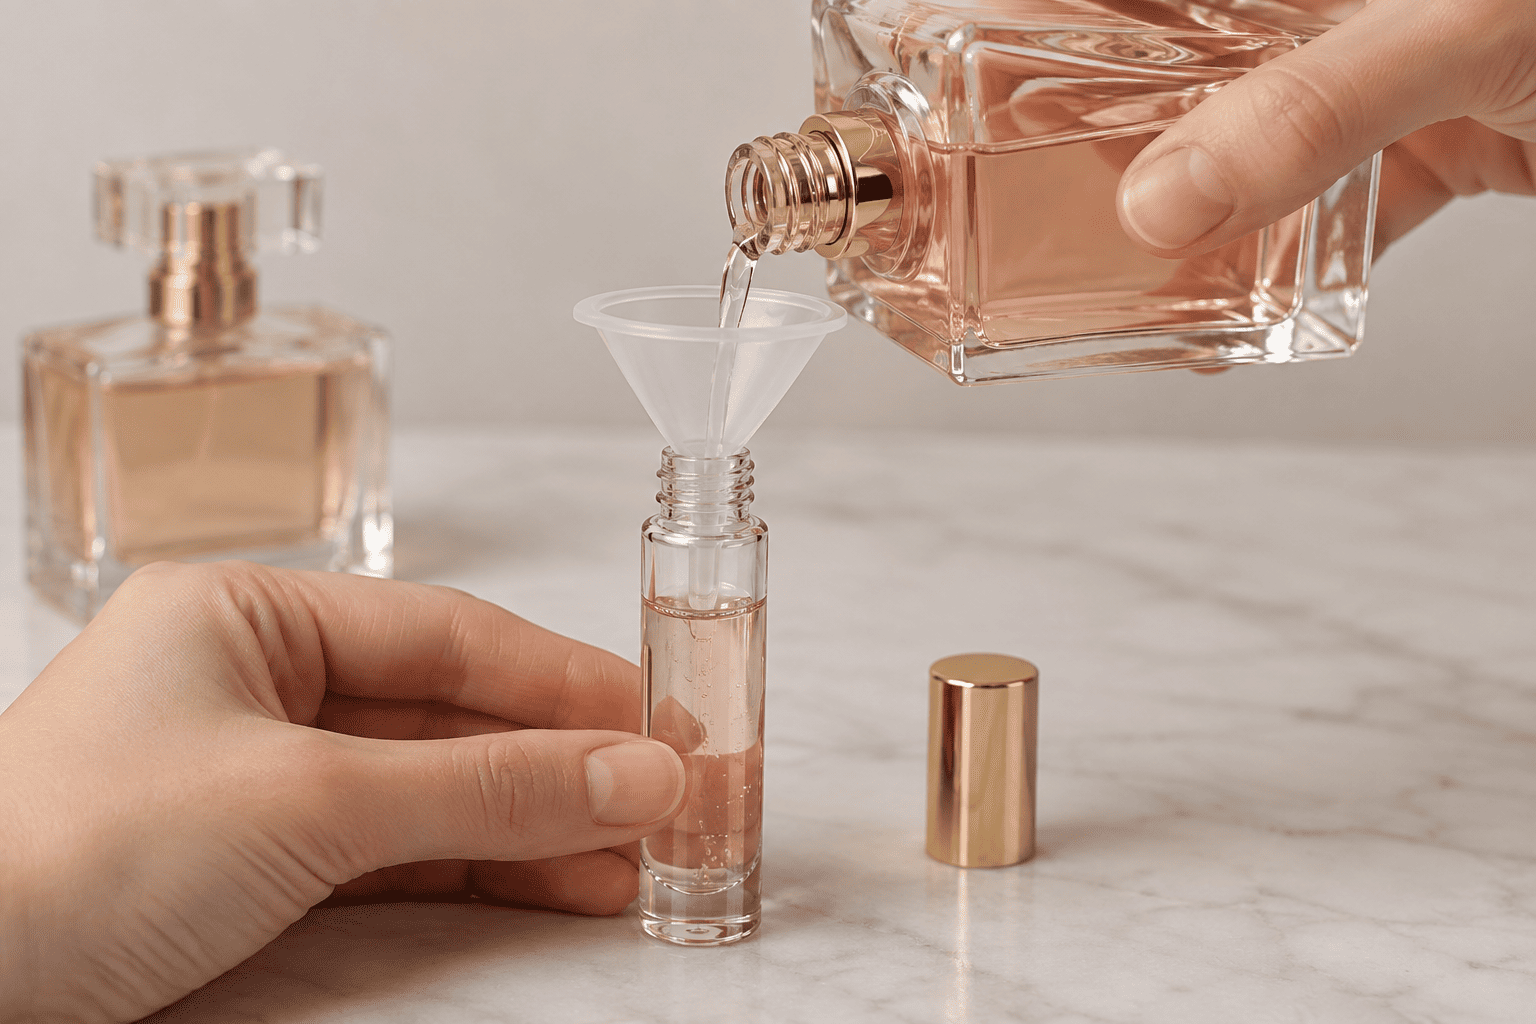
How I Use a Small Perfume Funnel
I first check the original perfume bottle.
Some perfume bottles use a screw pump. I can remove this type of pump by turning it.
Other perfume bottles use a crimp pump. I cannot simply unscrew this structure because the pump is fixed to the glass neck with an aluminum collar.
If I can safely open the original bottle, I place a small funnel into the travel bottle.
Then I pour the perfume slowly.
I stop before the liquid reaches the very top.
After filling, I remove the funnel and close the travel bottle.
I wipe the outside of the bottle and test the pump.
| Bottle Type | Funnel Method |
|---|---|
| Screw-neck perfume bottle | Very suitable |
| Refillable glass bottle | Very suitable |
| Open sample bottle | Suitable |
| Crimp perfume bottle | Usually difficult |
| Bottom-fill atomizer | Not needed |
| Very narrow bottle neck | Needs a small funnel |
I prefer a small funnel made for cosmetic or perfume filling.
A normal kitchen funnel is usually too large.
I also make sure the funnel is clean and completely dry.
Why I Avoid Water in the Funnel
I never use a wet funnel when I fill perfume.
A small amount of water can mix with the perfume and change the appearance of the liquid.
It can also affect the fragrance formula.
If I wash the funnel first, I let it dry completely.
I can also rinse the funnel with suitable alcohol and allow the alcohol to evaporate before use.
For commercial filling, I apply more control.
I do not treat perfume filling tools like normal household tools.
I use clean equipment. I also try to keep the filling process repeatable.
I think this becomes more important when a perfume brand fills many bottles instead of one bottle.
When I Recommend This Method
I like the funnel method when both bottles can be opened.
It gives me good control, and perfume waste is usually low.
I also think this method works well for small perfume brands during early product testing.
A founder may only need to prepare several samples or test bottles.
At that stage, a simple manual filling method can be practical.
When order volume grows, I normally recommend moving to a more efficient filling system.
The bottle design also matters.
If a brand wants customers to refill the bottle easily at home, a screw-neck or removable pump design may be more practical.
If the brand needs better sealing and a more traditional perfume packaging structure, a crimp bottle may make more sense.
I always match the filling method to the final use.
How Do I Refill a Crimp Perfume Bottle With a Refill Tool?
A crimp perfume bottle is harder to refill because the pump is fixed to the glass neck. I do not want to damage the collar just to add perfume.
I refill a crimp perfume bottle by connecting a special refill tool to the original spray valve. The tool can remove old perfume and inject new perfume through the same valve without removing the pump or aluminum collar.
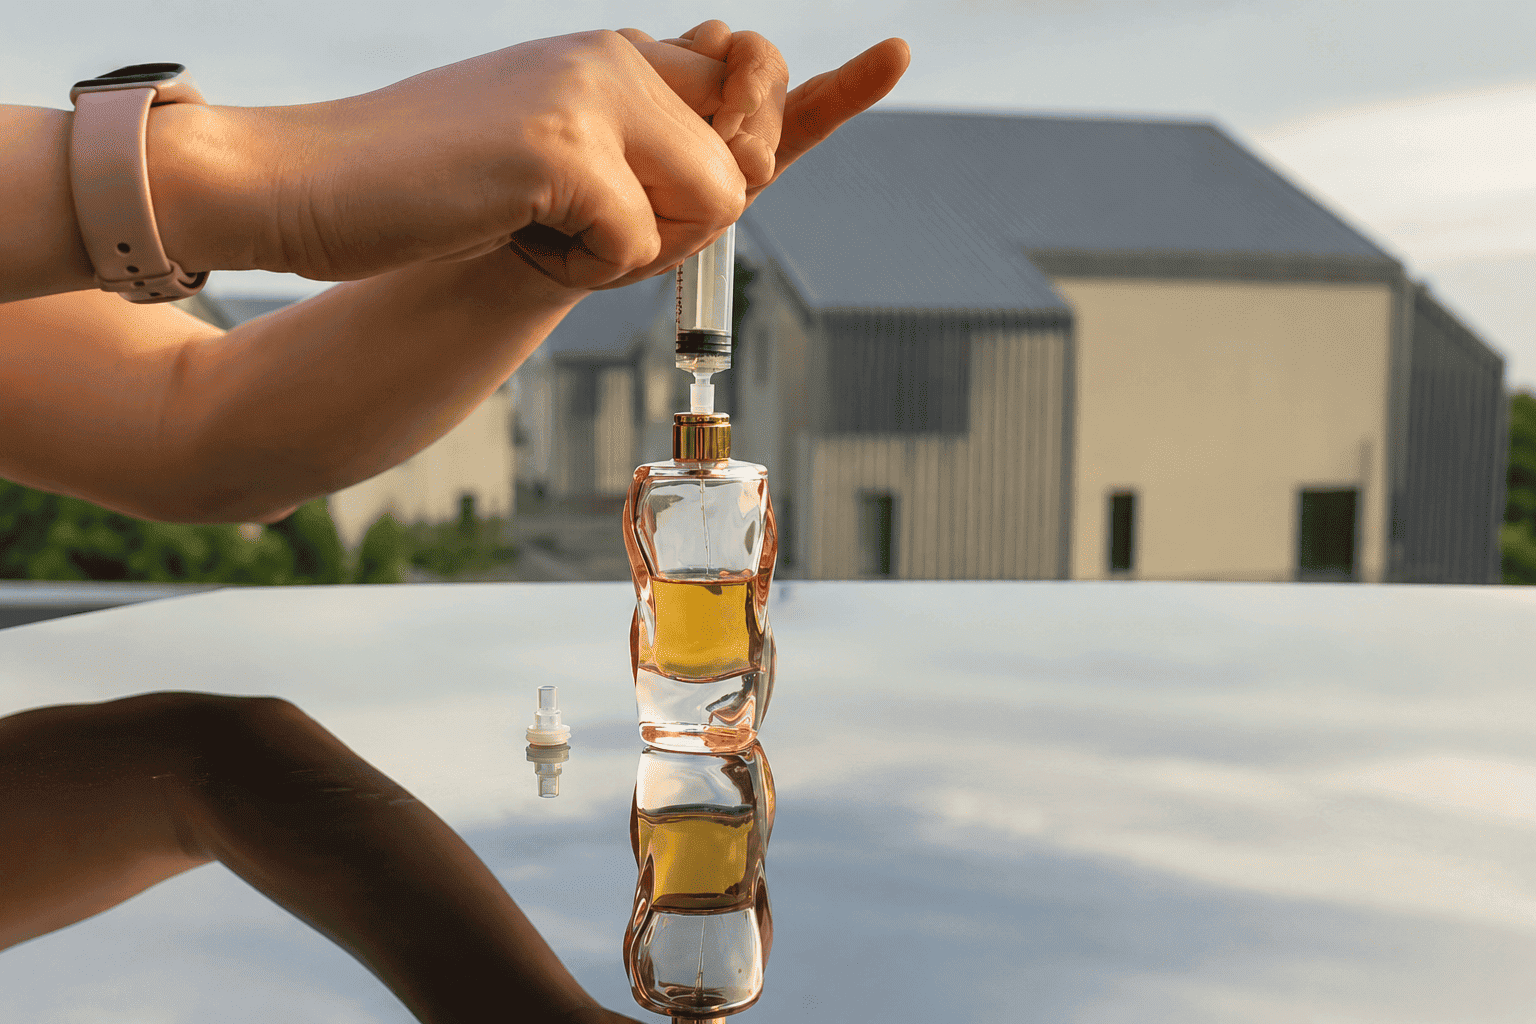
Why a Crimp Perfume Bottle Is Different
I treat a [crimp perfume bottle ][[1]]differently from a screw-neck perfume bottle.
A screw-neck pump can normally be removed by turning it.
A crimp pump cannot.
The pump is fixed to the bottle neck with an aluminum crimp collar.
This structure creates a strong seal. It is very common in commercial perfume packaging because it gives the bottle a clean appearance and good sealing performance.
The problem appears when I want to refill the bottle.
With the traditional method, I need to remove the aluminum collar first.
Then I remove the pump.
After filling, I usually need to install another pump or collar and crimp it again.
This process takes more time.
It also requires additional parts and equipment.
I therefore prefer a dedicated refill tool when I want to keep the original pump in place.
How the Perfume Refill Tool Works
I first remove the decorative spray button from the perfume bottle.
The pump stem remains in place.
I then connect the refill tool to the existing spray valve.
The tool can pull the remaining perfume out through the pump system.
After that, I can use the same connection to push new perfume back into the bottle.
I do not need to open the glass bottle.
I also do not need to remove the aluminum collar.
| Refill Step | Traditional Crimp Refill | Refill Tool Method |
|---|---|---|
| Remove aluminum collar | Yes | No |
| Remove original pump | Yes | No |
| Empty old perfume | Open the bottle | Extract through the valve |
| Add new perfume | Fill through the bottle neck | Inject through the valve |
| Install another pump | Usually yes | No |
| Install another collar | Usually yes | No |
| Use a crimping machine | Usually yes | No |
| Keep original bottle structure | More difficult | Easier |
I explain this process in more detail in my guide on how to refill a crimp perfume bottle without removing the pump.
Why I Prefer This Method for Crimp Glass Bottles
I think the biggest advantage is that I can keep the original packaging structure.
A perfume bottle may already have spray coating, frosting, printing, decals, electroplating, a custom cap, and other decoration.
I do not want to damage these parts every time I refill the perfume.
The refill tool lets me keep the glass bottle, pump, collar, and decoration in place.
I also reduce the need for replacement packaging parts.
This can be useful for perfume refill programs.
A brand can sell the original perfume in a high-quality glass bottle.
Then the customer can bring the same bottle back to a perfume store, perfume bar, distributor, or refill station.
The staff can refill the bottle without removing the crimp pump.
I think this creates a practical connection between traditional perfume packaging and reusable packaging.
When I Use This Refill Tool
I do not use this tool for every travel bottle.
I use it mainly when the destination bottle is a crimp glass bottle with a fixed pump.
| Bottle Type | Method I Prefer |
|---|---|
| Bottom-fill travel atomizer | Bottom-fill method |
| Open travel bottle | Direct spray |
| Screw-neck glass bottle | Funnel |
| Open sample bottle | Pipette or syringe |
| Crimp perfume bottle | Special refill tool |
For small perfume brands, I think this method can create another service opportunity.
A brand can keep the premium appearance of a crimp perfume bottle and still offer a refill option.
This can help the brand keep the customer connected to the original packaging for a longer time.
Which Perfume Transfer Method Should I Choose?
I choose the transfer method based on the bottle structure, perfume value, filling volume, and how much control I need during the process.
I use bottom filling for compatible atomizers, direct spraying for small amounts, a funnel for open bottles, and a refill tool for crimp bottles. I choose the method that matches the packaging structure.
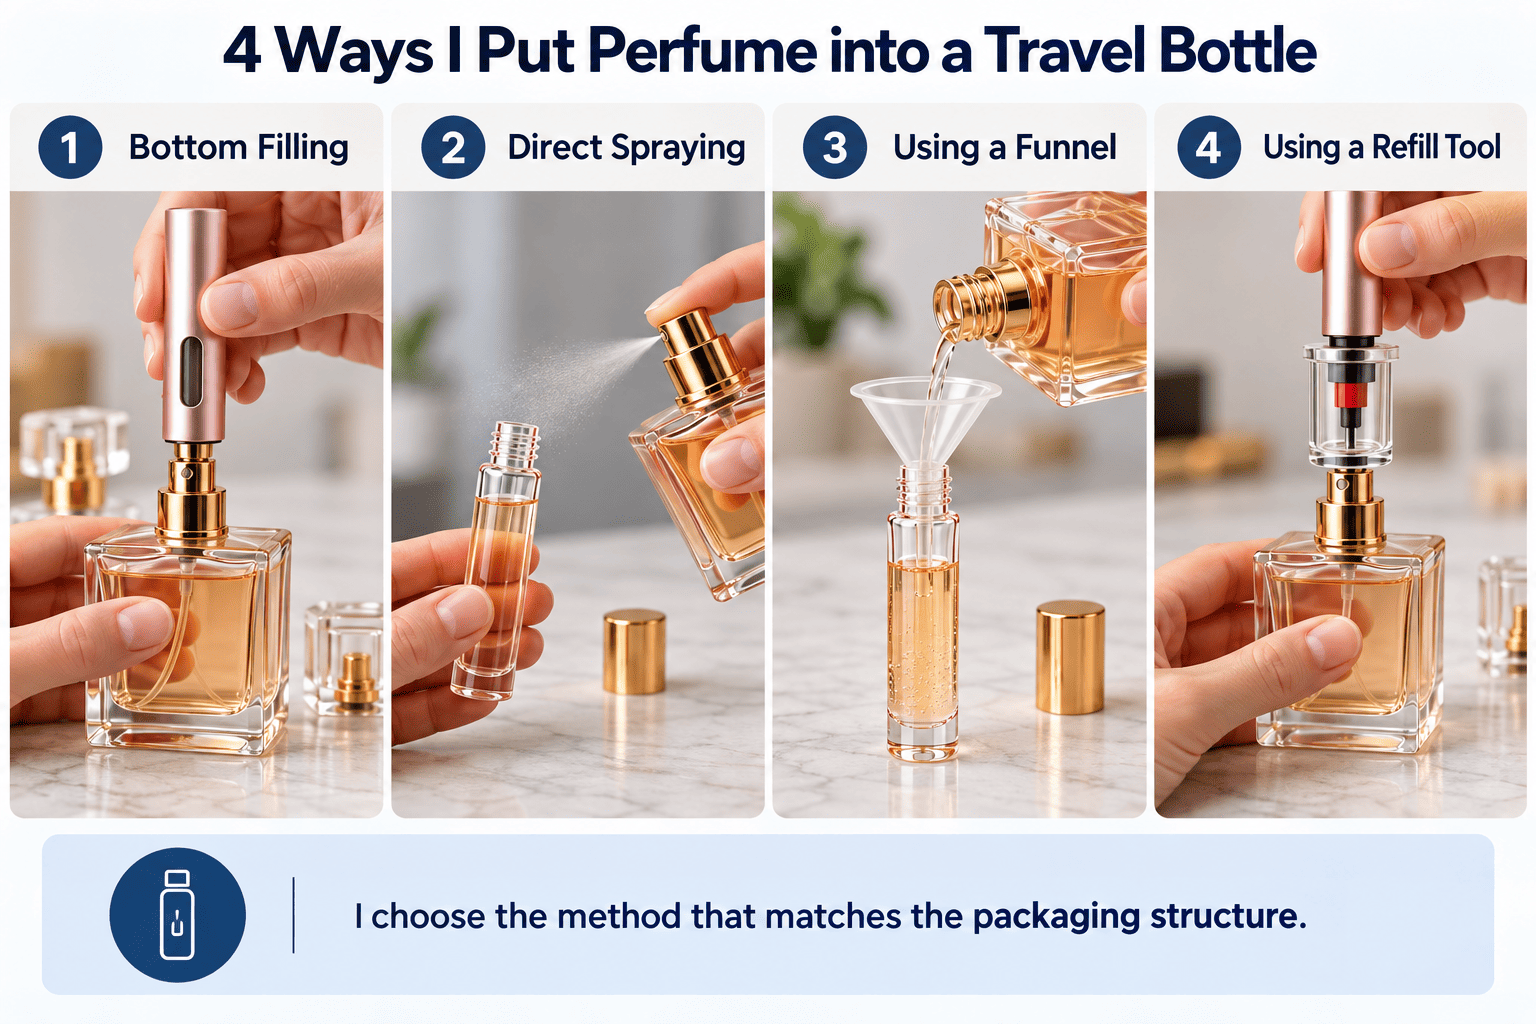
I Compare the Four Methods Before I Start
I do not choose a filling method only because it looks easy.
I first check whether it matches the bottle.
| Method | Ease | Perfume Waste | Control | Extra Tool | Best Use |
|---|---|---|---|---|---|
| Bottom-fill | Very easy | Low | Medium | No | Travel atomizers |
| Direct spray | Easy | Medium | Low | No | Small quantities |
| Funnel | Easy | Low | Medium | Yes | Open bottles |
| Refill tool | Medium | Low | High | Yes | Crimp bottles |
Bottom filling is usually the fastest choice for personal travel.
Direct spraying is useful when I only need a small amount and do not have another tool.
A funnel works well when I can open the bottles.
A refill tool becomes useful when the bottle has a crimp pump that I want to keep in place.
I Think About the Value of the Perfume
I become more careful when I transfer expensive perfume.
I do not want to lose a large amount of fragrance in the air.
I also do not want to damage the original bottle.
In this case, I prefer a method with better control.
I think a transfer adapter or refill tool can make more sense than repeated spraying.
I Think About Bottle Design
I also consider how often the bottle will be refilled.
If a customer wants a small atomizer only for travel, a bottom-fill design can be enough.
If a perfume brand wants a refillable retail bottle, I think the packaging design needs more planning.
The pump, neck finish, gasket, collar, cap, and refill method all need to work together.
I do not treat these parts separately.
I see the bottle as a complete packaging system.
That approach helps me reduce filling problems and leakage problems before the bottle reaches the customer.
How Do I Choose a Good Travel Perfume Bottle?
I choose a travel perfume bottle based on the material, pump quality, sealing, filling structure, capacity, and the way I plan to use it.
I prefer a travel perfume bottle with stable sealing, a fine mist pump, and a filling structure that matches the original perfume bottle. Glass is a strong choice because it offers good fragrance compatibility and a premium look.
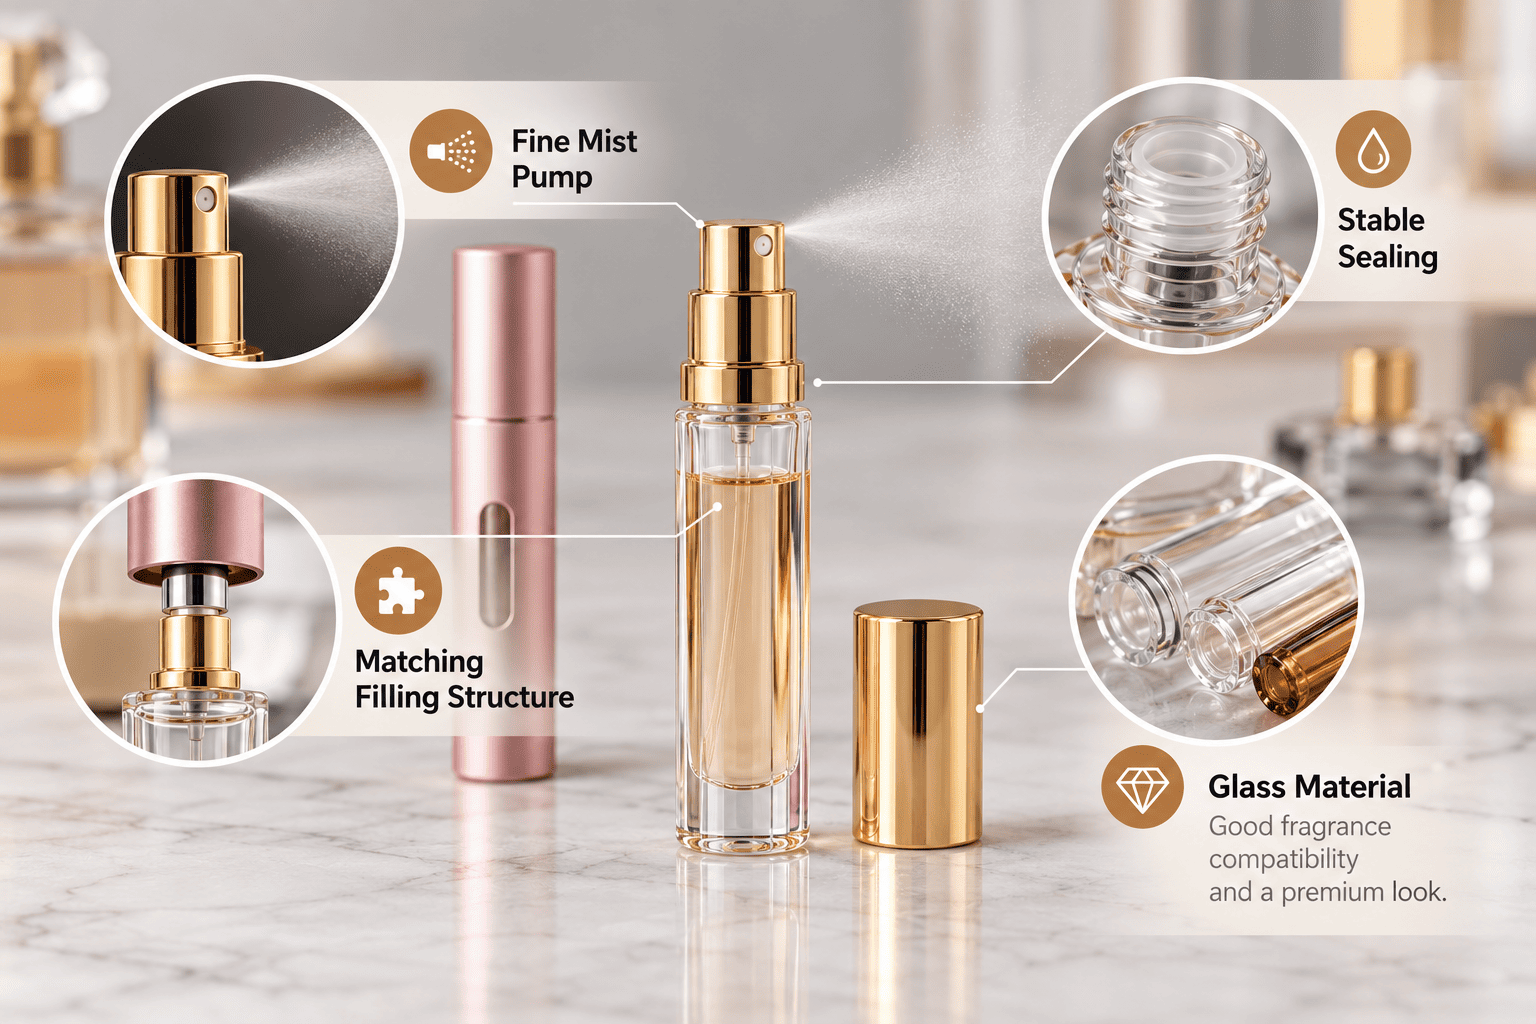
I Look at the Glass Bottle First
I prefer glass for most perfume packaging.
Glass gives the product a clean and premium appearance.
It also works well with many decoration methods.
I can use clear glass, colored glass, spray coating, frosting, printing, decals, gold decoration, and other finishes.
Plastic travel atomizers can be lighter and cheaper.
However, I pay more attention to material compatibility when perfume stays inside the bottle for a long time.
I Check the Spray Pump
I think the spray pump is one of the most important packaging parts.
The customer may choose the bottle because of its shape, but the customer interacts with the spray pump every day.
I want the pump to produce a fine and even mist.
I also want the pump to return smoothly after each press.
I check whether liquid appears around the nozzle.
I also check whether the pump leaks around the neck.
| Packaging Part | What I Check |
|---|---|
| Glass bottle | Thickness, shape, finish |
| Spray pump | Fine and even mist |
| Gasket | Fragrance compatibility |
| Collar | Secure connection |
| Cap | Good fit |
| Bottom valve | Leakage resistance |
| Decoration | Scratch resistance |
| Box | Protection during transport |
I Test Before I Travel
I do not fill a travel bottle and immediately put it beside my clothes.
I test it first.
I fill the bottle.
Then I spray it several times.
I wipe the outside clean.
I leave it standing and check the pump and bottle neck.
I may also turn it upside down for a short period to see whether I can find any perfume around the sealing area.
If I see a leak, I do not use the bottle for travel.
I also place the perfume inside a protective bag when I travel.
A good bottle can reduce leakage risk, but I still prefer extra protection.
What Mistakes Do I Avoid When Filling a Travel Perfume Bottle?
Small mistakes can waste perfume or damage the package. I avoid overfilling, dirty tools, wrong connections, open flames, and untested bottles.
I avoid five common mistakes when transferring perfume: overfilling, using dirty or wet tools, forcing incompatible parts, filling near heat or flames, and ignoring leaks after filling.
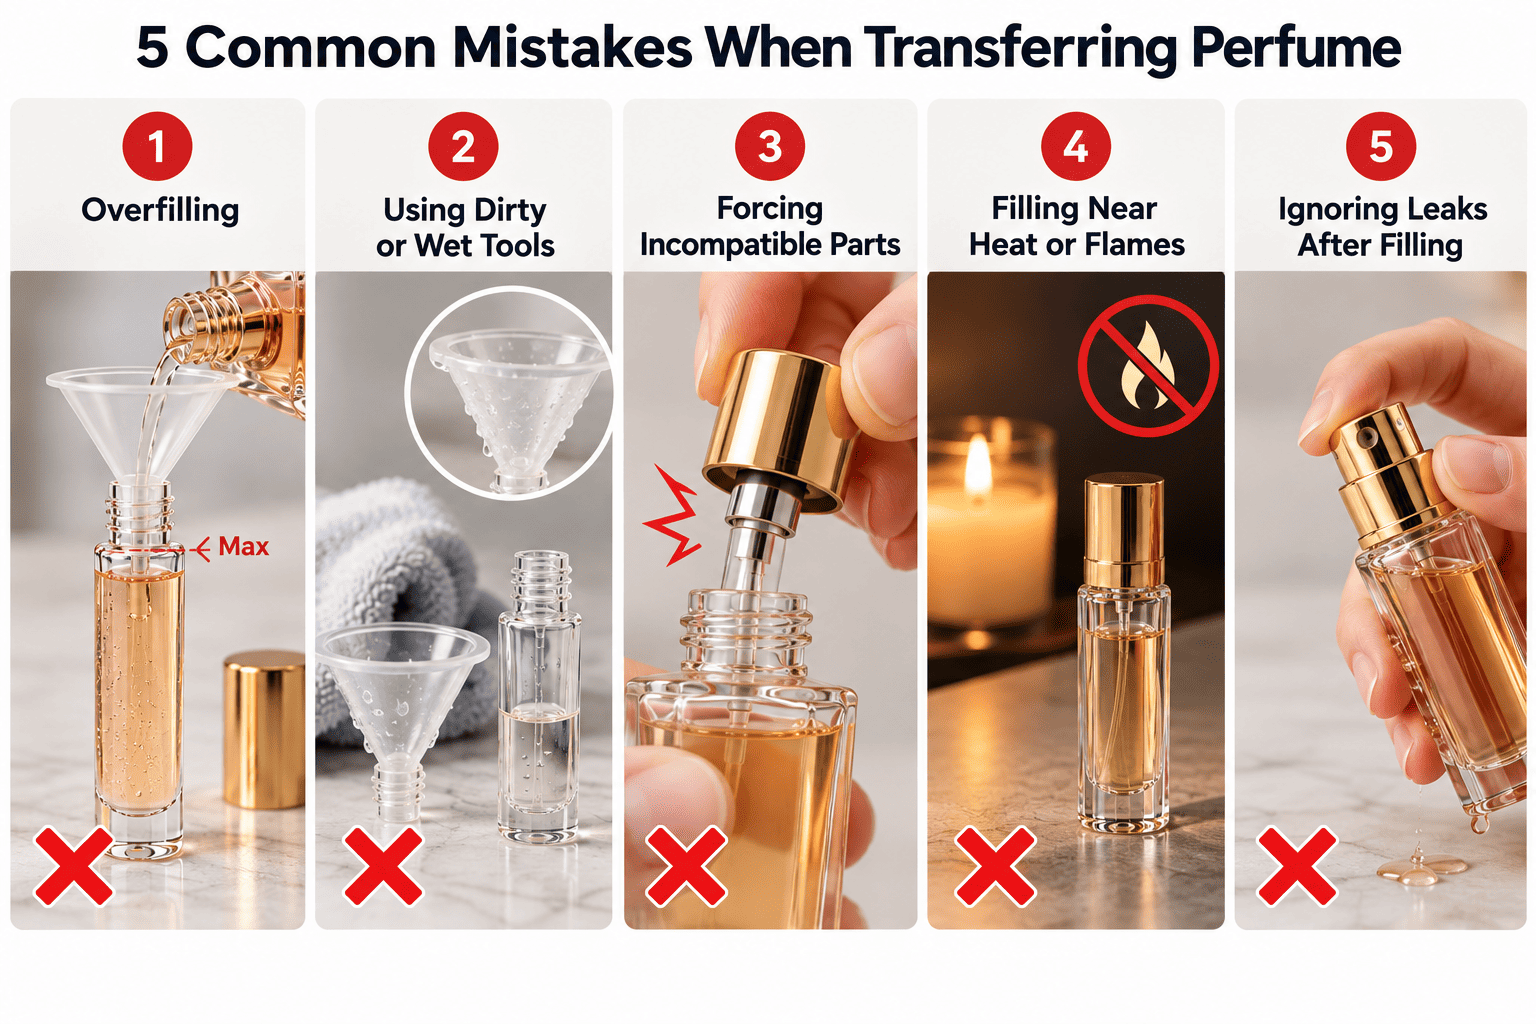
I Do Not Overfill the Bottle
I normally stop when the bottle is around 80% to 90% full.
I do not push liquid all the way to the top.
I prefer to leave a small amount of air space.
This also makes it easier to close or operate the bottle without pushing perfume out.
I Do Not Use Dirty Filling Tools
I always use a clean funnel, adapter, pipette, or refill tool.
I do not use tools that have been used for food, medicine, oil, or another unknown liquid.
I also make sure the tool is dry.
I do not want water or another liquid to mix with the perfume.
I Do Not Force the Pump or Valve
If two parts do not fit, I stop.
I never force a bottom-fill atomizer onto a pump stem that is too large.
I also do not pull a crimp pump out with force when the bottle was not designed to open.
This can damage the pump, glass neck, or collar.
I Do Not Ignore Leakage
I think even a small leak matters.
A few drops can damage a box or label.
A larger leak can damage clothes, bags, and other products.
For a perfume brand, leaking packaging can also hurt the brand image.
I therefore test the complete bottle system before production.
I check the glass bottle.
I check the spray pump.
I check the gasket and collar.
I check the cap.
I also test the decoration and outer packaging.
At Hongyan Glass Bottle, I work with more than 500 stock perfume glass bottle designs. I also support spray coating, frosting, gold decoration, decals, caps, sprayers, boxes, and other perfume packaging solutions.
When a customer needs a new bottle shape, I can also support custom development and 3D sampling before the final glass mold.
I think this approach is useful for small and growing perfume brands.
The brand can start with an existing bottle and a lower investment.
Then it can build a more customized package as the business grows.
Conclusion
I choose bottom filling, direct spraying, a funnel, or a refill tool based on the bottle structure. The right method reduces waste, leakage, and packaging damage.
[[1]]: https://www.reddit.com/r/DIYfragrance/comments/1hydixf/to_crimp_or_not_to_crimp_the_ultimate_cap_battle/ "crimp perfume bottle "