
Custom glass bottle molding can create strong brand value. However, one skipped test can cause mold rework, mass production waste, and a delayed product launch.
The biggest custom glass bottle molding mistakes come from skipping professional validation. Brands should confirm market demand, use 3D samples, match glass materials and machines, test molds, coordinate all packaging parts, and define clear mass production standards.
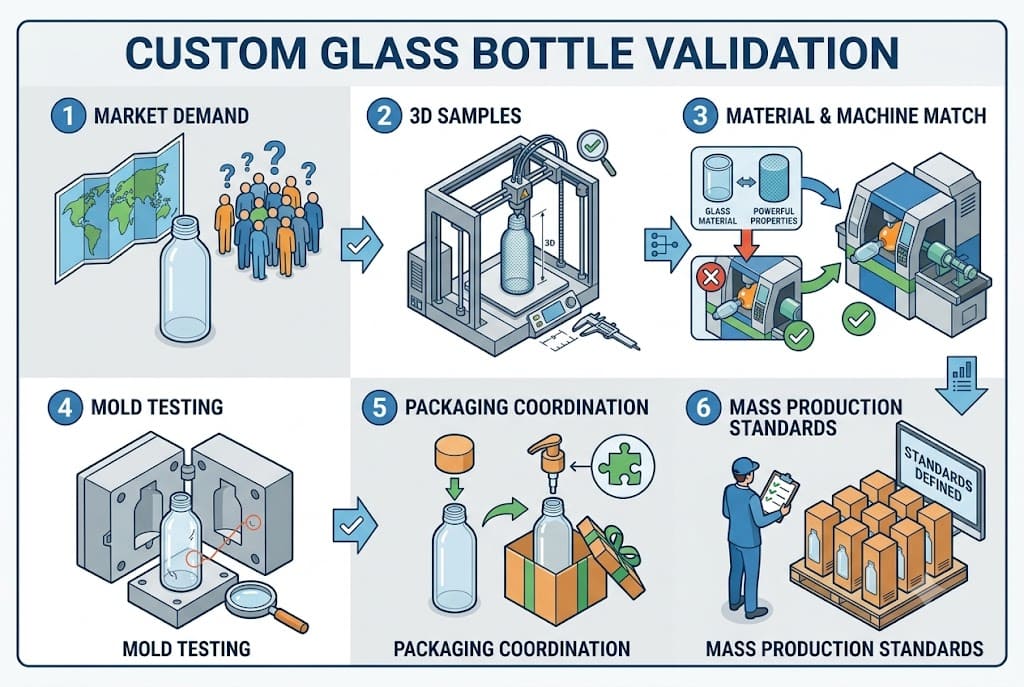
I have helped many perfume brands develop custom glass bottles. Some projects moved smoothly from design to production. Some projects faced expensive problems that could have been prevented.
Most problems did not come from a lack of creative ideas. They came from skipping important validation steps.
Many beginners focus on three things:
- Bottle appearance
- Mold price
- Delivery time
A professional glass bottle development team looks at much more.
We consider the bottle structure, glass material, machine type, pump, cap, surface decoration, [packaging compatibility][1], [production stability][2], and [final quality testing][3].
In my experience, mold development is only the beginning. The real challenge starts after the mold is finished.
Pitfall 1: Do Beginners Start Mold Development Before Validating the Market?
A unique bottle can look impressive, but a new mold cannot create customer demand. This mistake can place too much financial pressure on a young brand.
Beginners often invest in custom molds before confirming fragrance demand, pricing, target customers, and sales channels. I recommend testing the market with an in-stock bottle before investing in a fully customized glass bottle.
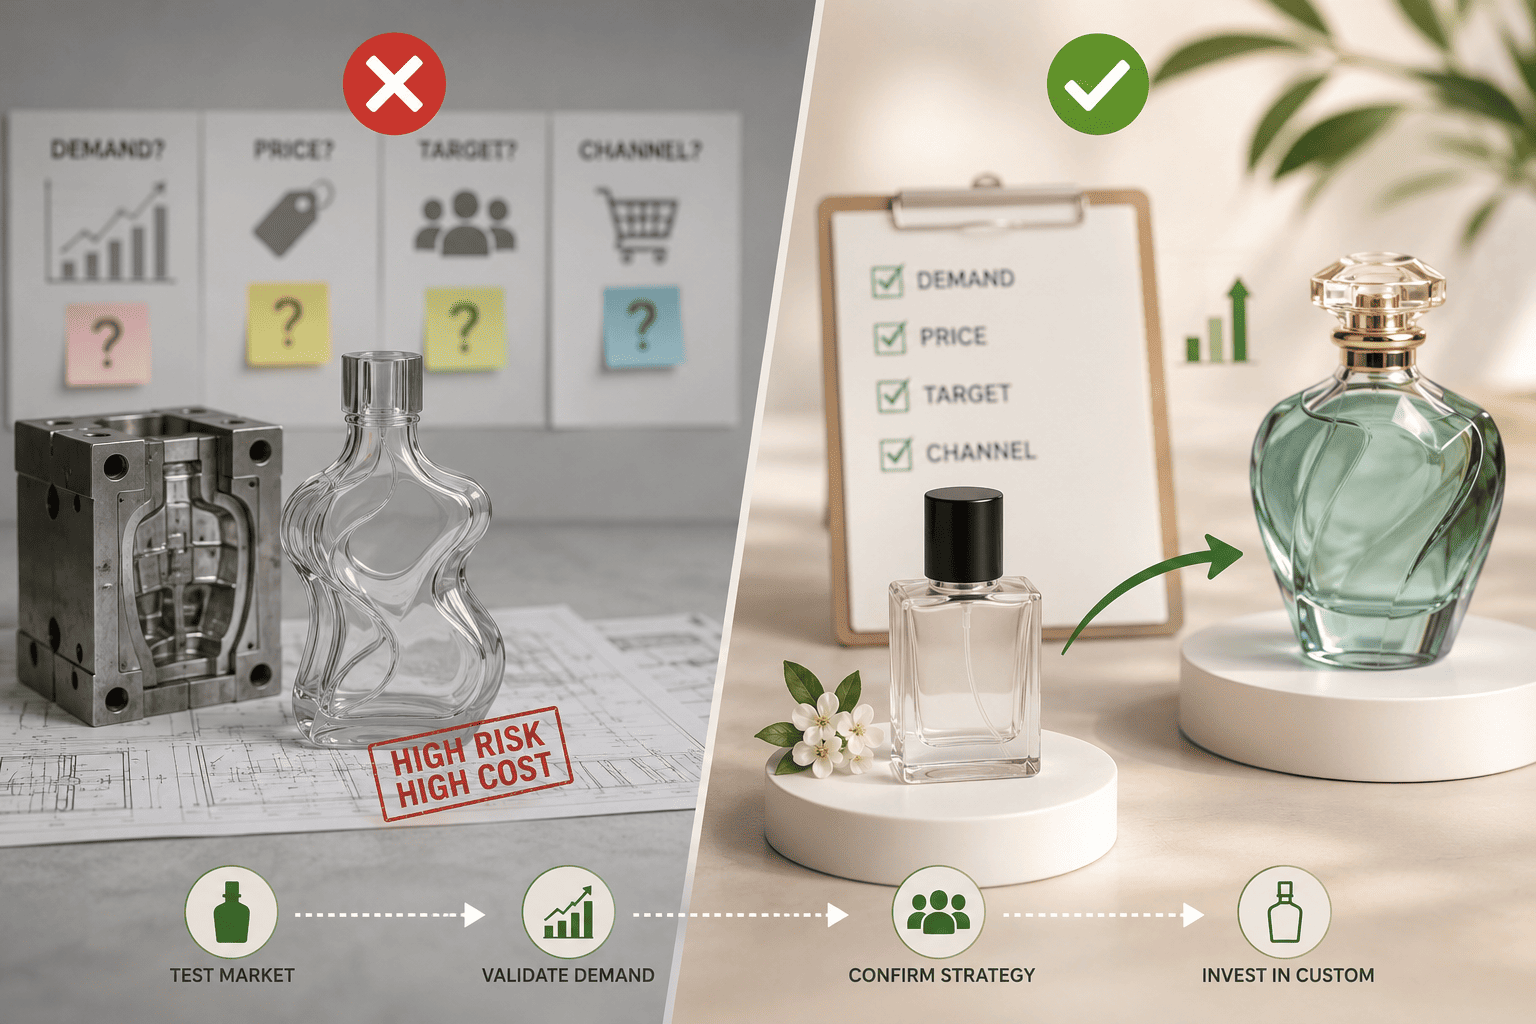
Why does market validation come before mold investment?
Many perfume founders believe that a unique bottle will make customers notice their brand immediately.
A unique bottle can support brand recognition. However, it cannot solve an unclear product position.
Before opening a private mold, I believe a brand should answer several basic questions:
| Question | Why It Matters |
|---|---|
| Who is the target customer? | It guides bottle style and price |
| What is the retail price? | It controls the packaging budget |
| Which fragrance sells best? | It reduces the risk of developing the wrong bottle |
| Which market will buy the product? | It affects size, decoration, and packaging |
| Can the brand reorder regularly? | It helps justify the mold investment |
I have seen founders place most of their starting budget into bottle development. They created a beautiful bottle, but they had too little money left for photography, advertising, inventory, and distribution.
This creates a difficult situation. The packaging is ready, but the business is not ready.
For a new brand, I often recommend using an existing bottle first. The brand can customize the color, logo, cap, frosting, decal, or electroplating. This approach still creates a clear identity, but it reduces risk.
The brand can then collect real sales data.
Once sales become stable, the brand can develop a private mold based on proven customer demand.
My advice is simple:
First prove your fragrance. Then build your bottle.
A [private mold][[4]] should support growth. It should not consume the resources needed to create that growth.
Pitfall 2: Do Beginners Confirm Only a 2D Drawing and Skip 3D Modeling?
A 2D drawing may look accurate on a screen. However, it cannot fully show the feeling, proportion, curves, and balance of a real glass bottle.
A professional process should include 2D drawing approval, 3D modeling, and a physical 3D prototype. These steps help brands verify the bottle’s proportions, curves, shoulder shape, base, neck position, and real hand feel before making a steel mold.
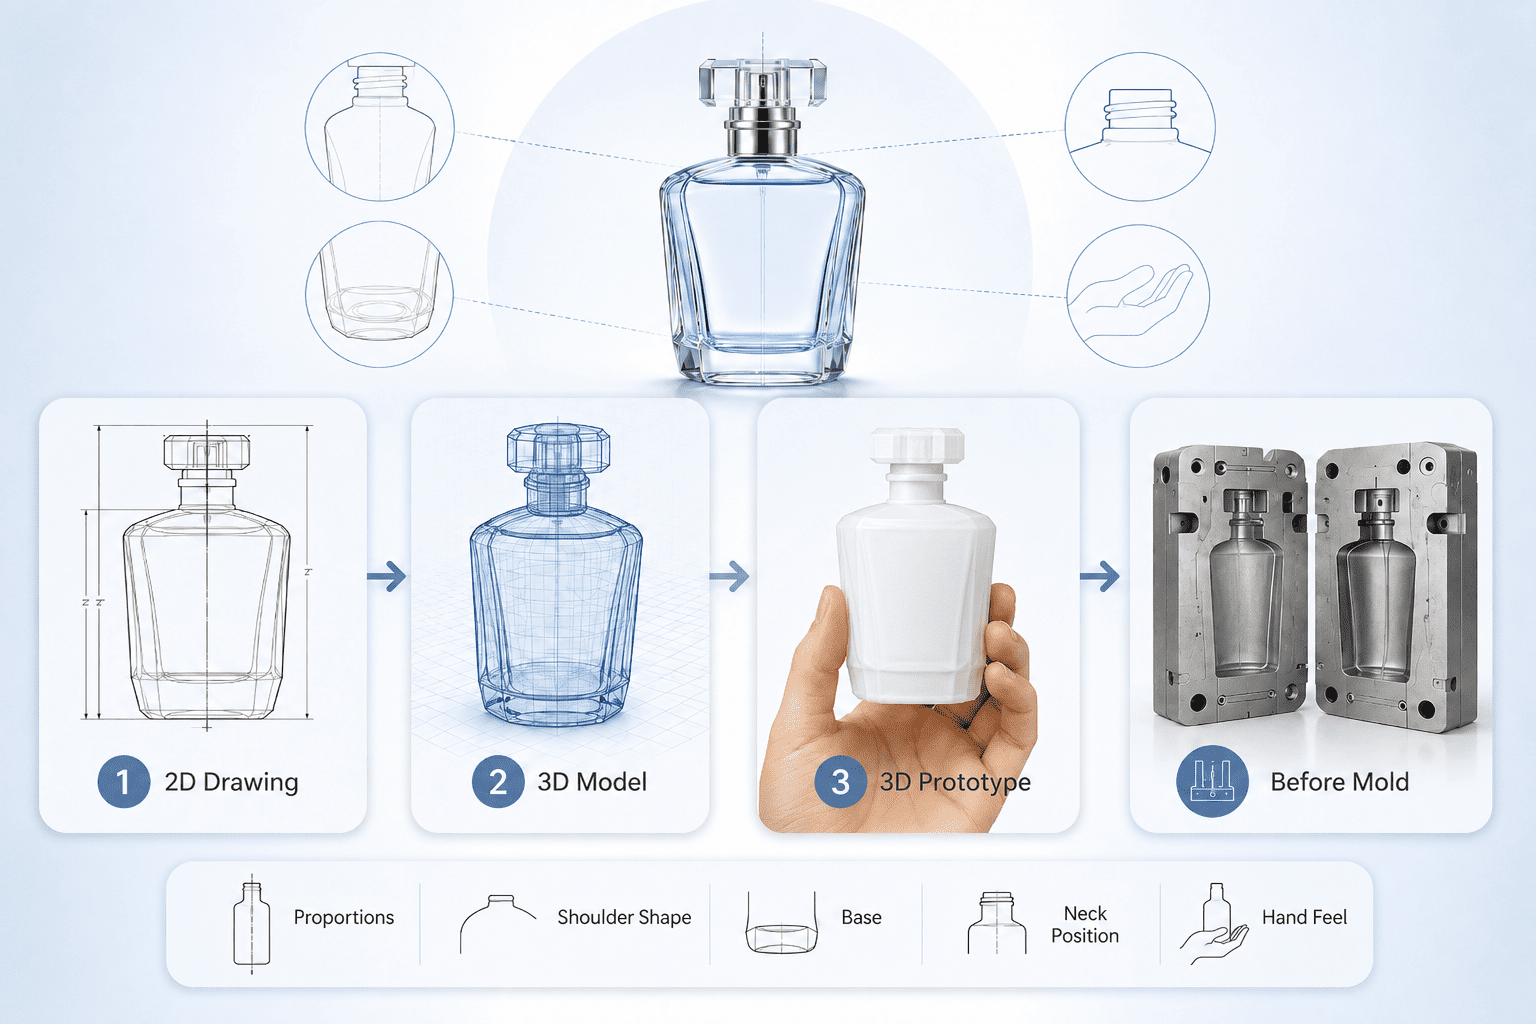
Why is a 2D drawing not enough?
Many first-time buyers approve a custom bottle after checking only the length, width, height, capacity, and basic outline.
A flat drawing can provide useful measurements. However, it cannot fully reproduce the three-dimensional details of the bottle.
It may not clearly show:
- The real curve of the bottle body
- The transition between the shoulder and neck
- The balance between the bottle body and cap
- The vertical position of the bottle mouth
- The thickness and curve of the base
- The hand feel when the customer holds the bottle
I have seen designs that looked elegant in a flat drawing but appeared heavy and bulky after the mold was completed.
A small change in the shoulder curve can make the bottle look less refined. An uneven curved surface can also affect later decoration.
| Design Problem | Possible Effect |
|---|---|
| Bottle body is too wide | The bottle looks bulky |
| Shoulder transition is too sharp | The shape looks unnatural |
| Curved surface is uneven | Printing and labels may not sit correctly |
| Bottle neck is not vertical | The pump and cap may look tilted |
| Base curve is incorrect | The bottle may look unstable |
Once a steel mold is completed, major shape changes are difficult. In many cases, the brand needs to modify the mold heavily or create a new mold.
That means more cost and more lost time.
The correct process should be:
2D drawing confirmation → 3D digital modeling → 3D rendering → physical 3D prototype → final steel mold
I always recommend checking the physical prototype by hand. The brand should review the proportion, weight feeling, visual balance, cap size, and shelf appearance.
A 3D prototype does not perfectly copy glass behavior. However, it is still one of the best tools for confirming the design before the factory begins steel mold production.
Pitfall 3: Do Beginners Ignore Glass Material and Machine Differences?
Not every glass material or production machine suits every bottle. The wrong combination can reduce transparency, create unstable forming, and increase the defect rate.
Glass clarity, bottle weight, shape, and quality requirements should guide the choice of glass material and production machine. A factory technician should match the bottle with the correct raw material and equipment before production begins.
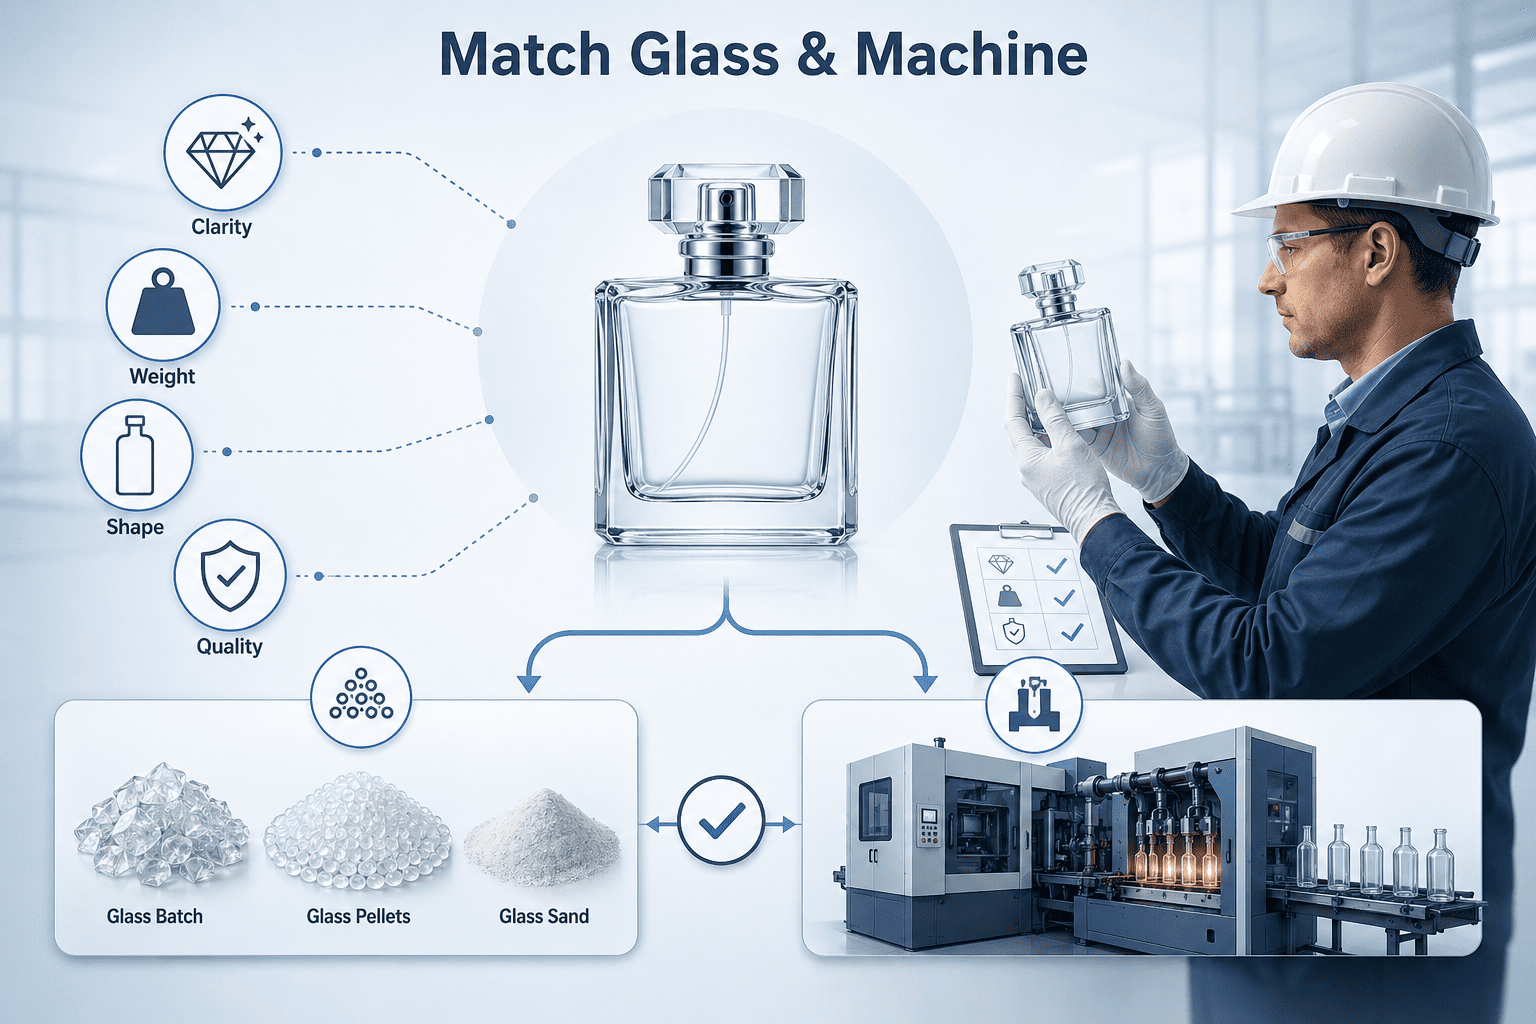
Why do glass material and machine selection matter?
Many buyers believe that one bottle shape can be produced with any glass material and any machine.
In reality, the glass formula and production equipment directly affect the final appearance and stability of the bottle.
For perfume packaging, two common options are crystal-white glass and standard high-white glass.
| Glass Type | Main Characteristics | Suitable Use |
|---|---|---|
| Crystal-white glass | High transparency, clean appearance, premium light refraction | Luxury perfume, essential oil, premium packaging |
| Standard high-white glass | Lower transparency, slight green tone, better cost control | Mass-market and cost-sensitive packaging |
The difference is not only visual.
Different glass materials have different density, flow, and forming behavior during production. The bottle weight and structure also affect the machine selection.
Depending on the bottle design, the factory may use different production systems, such as an individual section machine or another machine that better suits smaller or more detailed bottles.
A wrong match can create serious problems.
| Wrong Decision | Possible Result |
|---|---|
| Low-grade glass for a premium design | The bottle looks less valuable |
| Bottle weight does not suit the machine | Forming becomes unstable |
| Wrong equipment for the structure | The bottle may deform |
| Poor material flow | Wall thickness becomes uneven |
| Low production stability | Defect and waste rates increase |
I do not recommend that a beginner choose the glass material or machine only by price.
The brand should first define the required transparency, bottle weight, shape, surface treatment, retail position, and acceptable defect standard.
Then the factory technician should recommend the material and machine.
At Hongyan Glass Bottle, I believe quality control should start before the machine runs. When we match the glass material and production equipment correctly, we reduce risk from the source.
Pitfall 4: Do Beginners Focus Only on the Bottle and Ignore the Packaging System?
A perfume bottle does not work alone. A small size change can affect the pump, cap, collar, inner tray, box, and shipping protection.
The bottle, pump, cap, collar, inner tray, paper box, and shipping carton should be treated as one packaging system. Brands should test all components together before approving mass production.
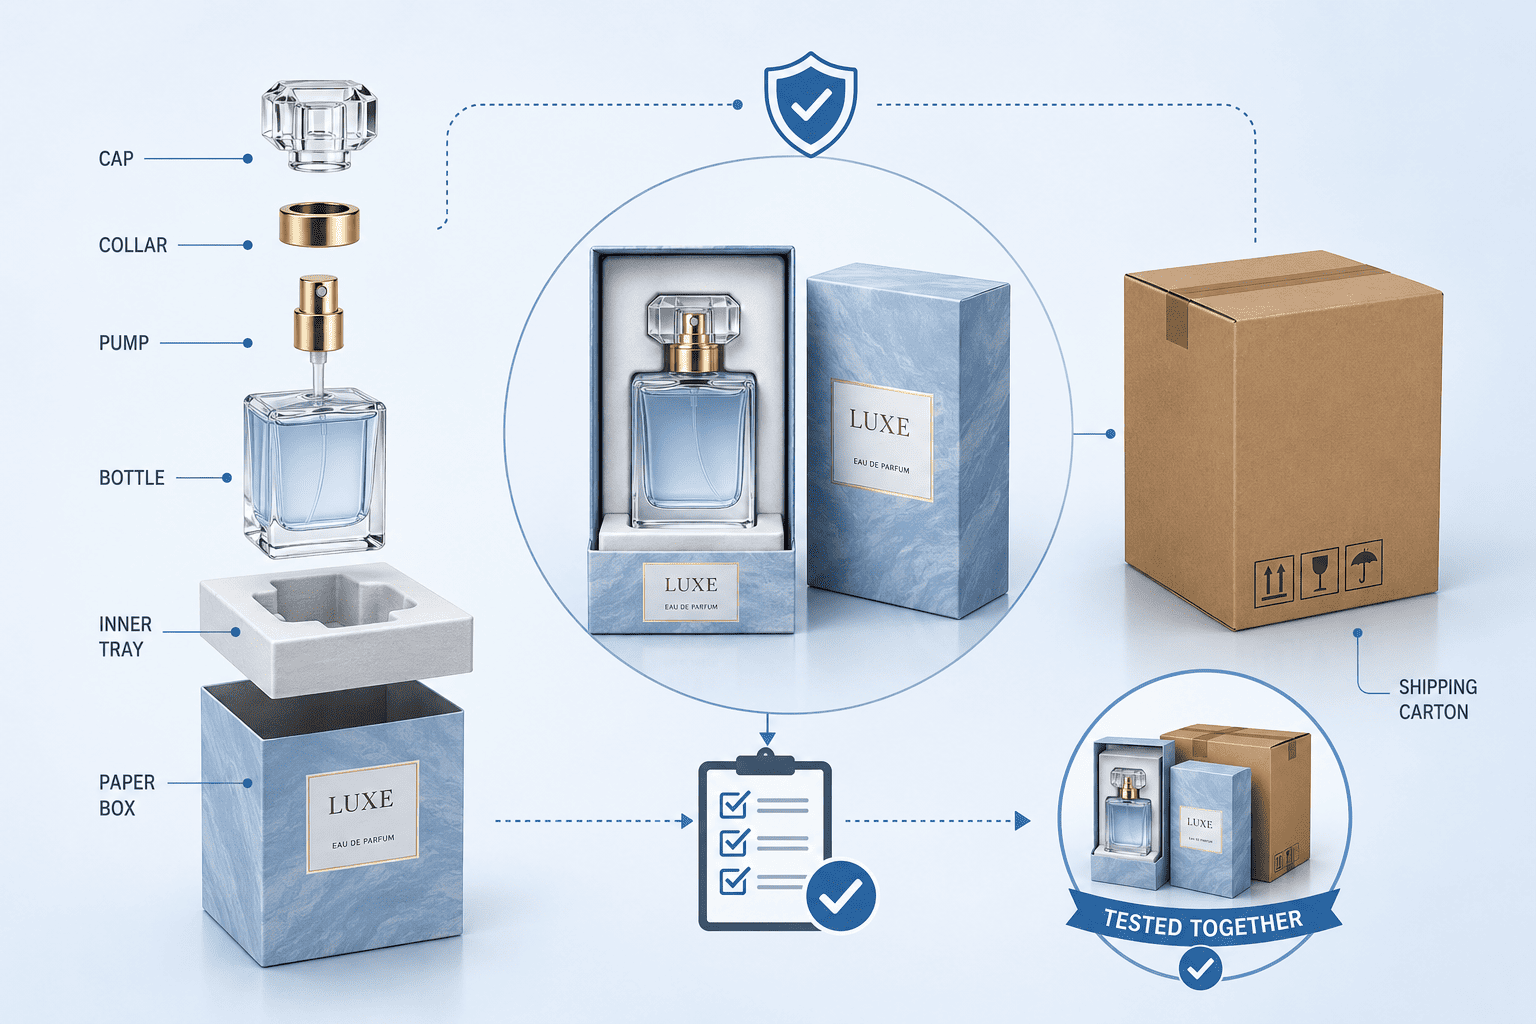
Why must every packaging component match?
Many brands develop the bottle first. Then they purchase the pump, cap, and box from different suppliers.
This may look efficient, but it can create compatibility problems.
During mold modification, even a small dimensional change can affect the full packaging system.
For example, a mold update may change the bottle neck or total height slightly. The cap may then sit a few millimeters higher.
If the box and inner tray were designed tightly around the original sample, the complete product may no longer fit.
| Component Change | Possible Packaging Problem |
|---|---|
| Cap becomes higher | The box cannot close |
| Bottle body becomes wider | The inner tray is too tight |
| Pump position changes | The cap cannot lock correctly |
| Bottle base changes | The bottle moves inside the tray |
| Total weight increases | The shipping carton needs more support |
This mismatch creates waste.
The brand may need to remake the inner tray, modify the box, change the cap, or delay the product launch.
I recommend that brands wait until the bottle, pump, and cap samples are ready before finalizing the inner tray and paper box.
The complete sample should go through several checks:
- Confirm the pump and bottle neck match.
- Test the spray function.
- Perform a sealing and leakage test.
- Confirm that the cap opens and closes correctly.
- Place the complete bottle inside the inner tray.
- Place the tray inside the final box.
- Perform a basic transport and drop test.
I view perfume packaging as a system, not a collection of separate parts.
This is also why Hongyan is moving beyond the role of a bottle supplier. We help customers coordinate the bottle, pump, cap, decoration, inner packaging, and outer packaging before mass production.
Pitfall 5: Do Beginners Skip Mold Trials and Strong-Light Inspection?
A finished steel mold does not mean the bottle is ready for mass production. Real molten glass behaves very differently from a resin prototype.
Every new steel mold should complete a machine trial before mass production. The factory should produce trial bottles and inspect them under strong light for wall thickness, bubbles, deformation, mold seams, base problems, and bottle neck alignment.
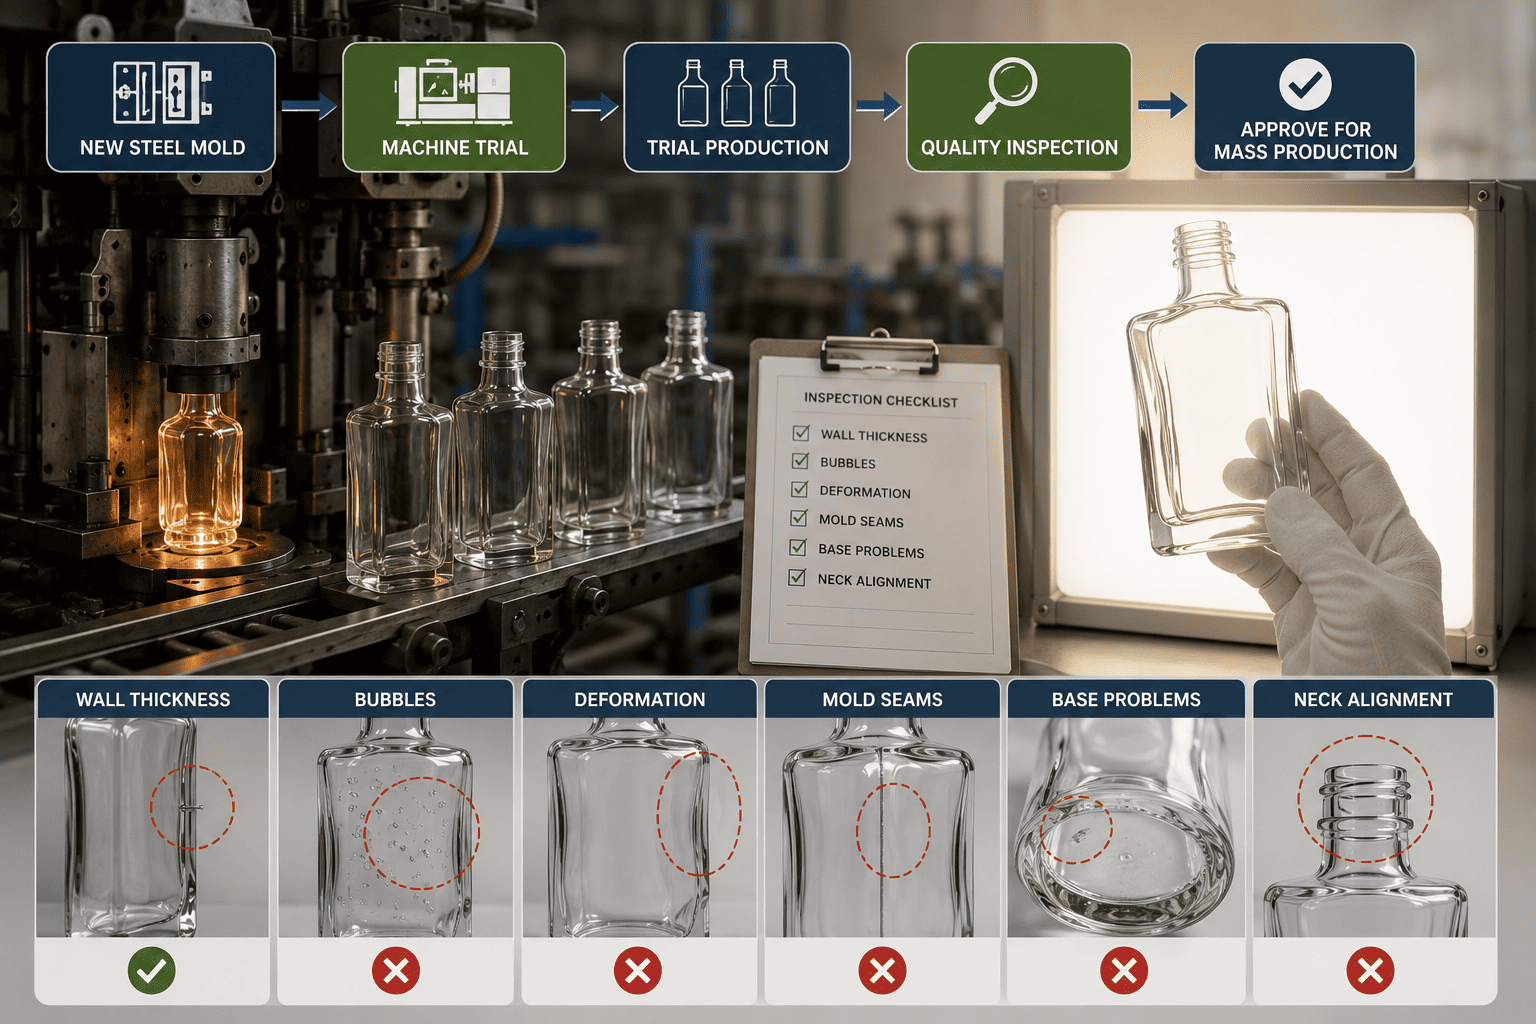
Why can a 3D sample not replace a glass trial?
A 3D printed prototype is usually made from resin.
It is useful for checking shape, size, proportion, and appearance. However, resin cannot reproduce the physical behavior of high-temperature molten glass.
Molten glass flows, stretches, cools, shrinks, and receives pressure inside the mold.
These factors may create problems that do not appear in the 3D sample.
For this reason, every new steel mold should complete a real machine trial.
The factory should produce dozens of glass samples and inspect them carefully under a professional strong light.
| Inspection Point | What We Check |
|---|---|
| Wall thickness | Whether all sides have a similar thickness |
| Bubbles | Large bubbles, dense small bubbles, or internal bubbles |
| Bottle alignment | Whether the body and neck are straight |
| Base | Whether the base is flat and balanced |
| Mold seam | Whether the seam is too thick or raised |
| Symmetry | Whether both sides match |
Wall thickness is especially important.
If one side is too thick and the other side is too thin, the bottle receives heat and pressure unevenly.
This can reduce impact resistance. It may also increase the risk of cracking, self-breakage, and transport damage.
A strong-light inspection can reveal hidden issues before the factory produces the full order.
The mold and process should be adjusted during the trial stage. The team may need to modify the mold, change the forming pressure, adjust the cooling speed, or improve the glass distribution.
Only after the trial samples meet the approved standard should the factory begin mass production.
Skipping this step may save a few days. However, it can place the entire order at risk.
Pitfall 6: Do Beginners Approve a Sample Without Defining Mass Production Standards?
A handmade sample can look excellent because a technician spends more time on it. Mass production may show particles, color differences, and weaker finishing.
The approved sample should become a signed production standard, not only a visual reference. Brands should define acceptable color variation, surface quality, decoration position, particle limits, and finishing standards before mass production.
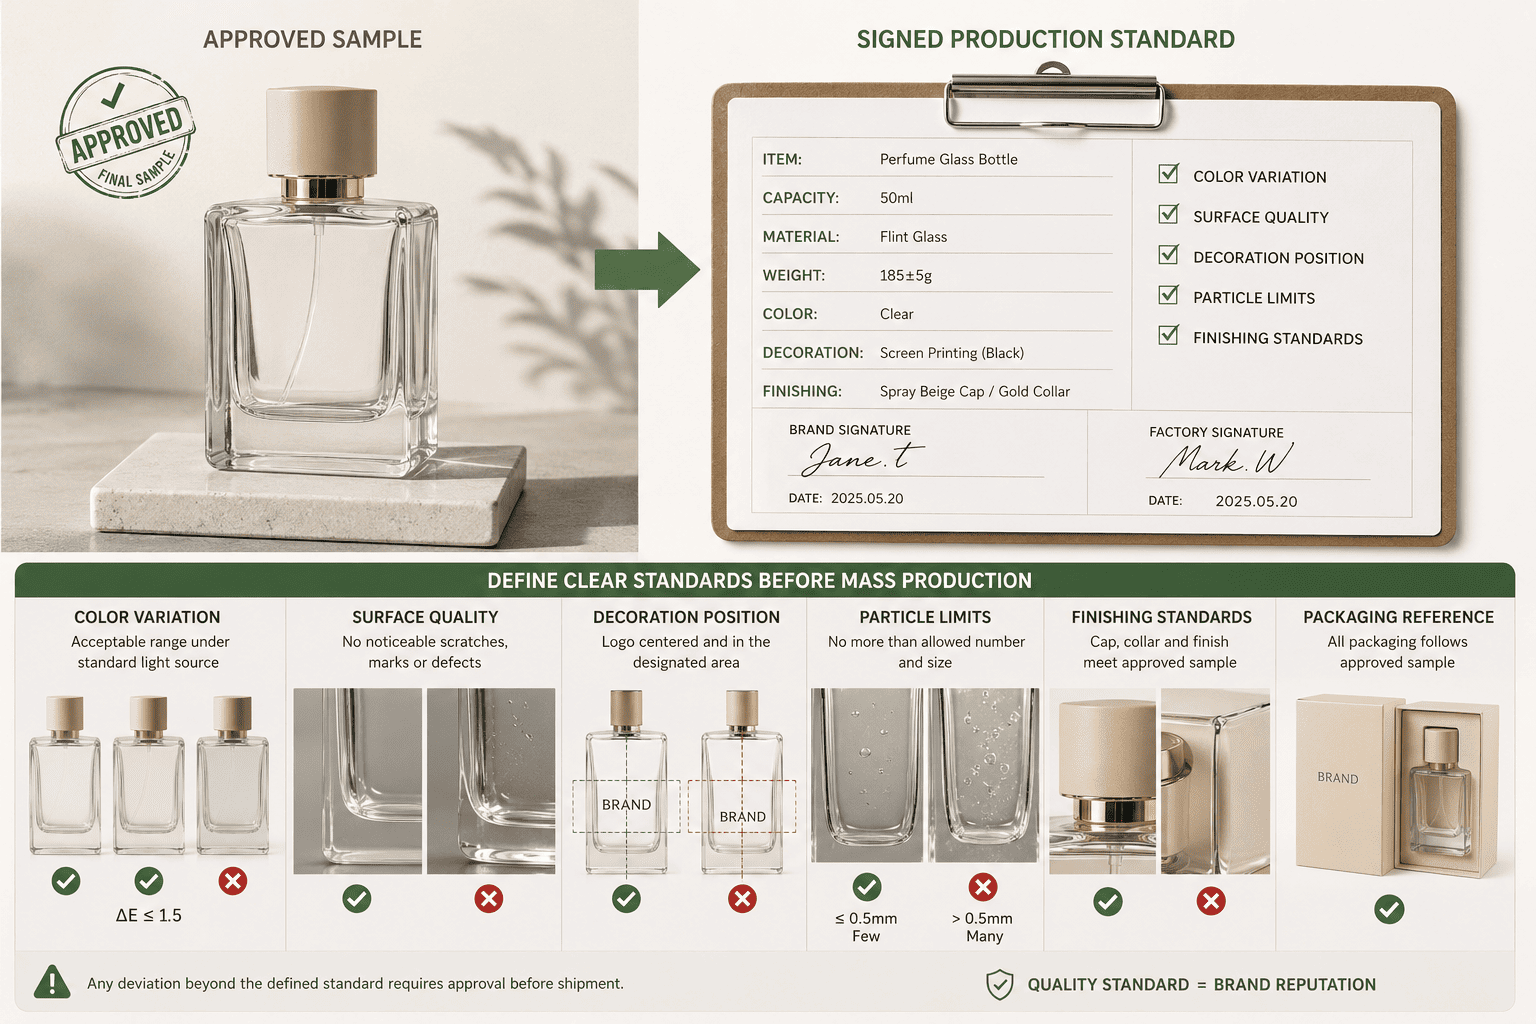
Why can mass production look different from the sample?
During the sampling stage, an experienced worker may handle each bottle individually.
The worker can spend more time cleaning the bottle, adjusting the spray color, checking the logo, and correcting small details.
This often makes the sample look very refined.
Mass production works differently.
The factory must process hundreds or thousands of bottles. The production speed is higher. If the cleaning, coating, drying, or inspection process is not controlled, the final goods may not match the sample.
One common problem is a rough or grainy surface after spray coating.
This may happen when the glass surface is not cleaned well before painting. Dust, oil, or small particles may remain on the bottle.
| Quality Difference | Possible Cause |
|---|---|
| Small particles under the coating | Incomplete surface cleaning |
| Uneven color | Unstable spray thickness |
| Different gloss level | Drying or coating variation |
| Logo position changes | Weak printing control |
| Surface feels rough | Dust or poor pre-treatment |
I always recommend treating the approved sample as the production benchmark.
The brand and supplier should define the important standards in writing.
These standards may include:
- Approved color range
- Surface particle limits
- Logo size and position
- Gloss or matte level
- Coating adhesion
- Decoration tolerance
- Cap and pump matching
- Packaging compatibility
The supplier should not reduce the quality standard after the sample is approved.
A beautiful sample has little value if the factory cannot reproduce it consistently.
The real goal is not to create one perfect sample.
The real goal is to produce thousands of bottles that maintain the same visual quality and brand feeling.
Pitfall 7: Do Beginners Use Only a Basic Visual Check for Mass Production?
A bottle can look acceptable to the eye and still have hidden cracks, sealing problems, weak threads, or unstable bottle mouths.
Mass production inspection should include detailed appearance checks, vacuum sealing tests, and bottle mouth torque tests. These tests help detect hidden leaks, cracks, weak threads, and closure problems before filling and shipping.
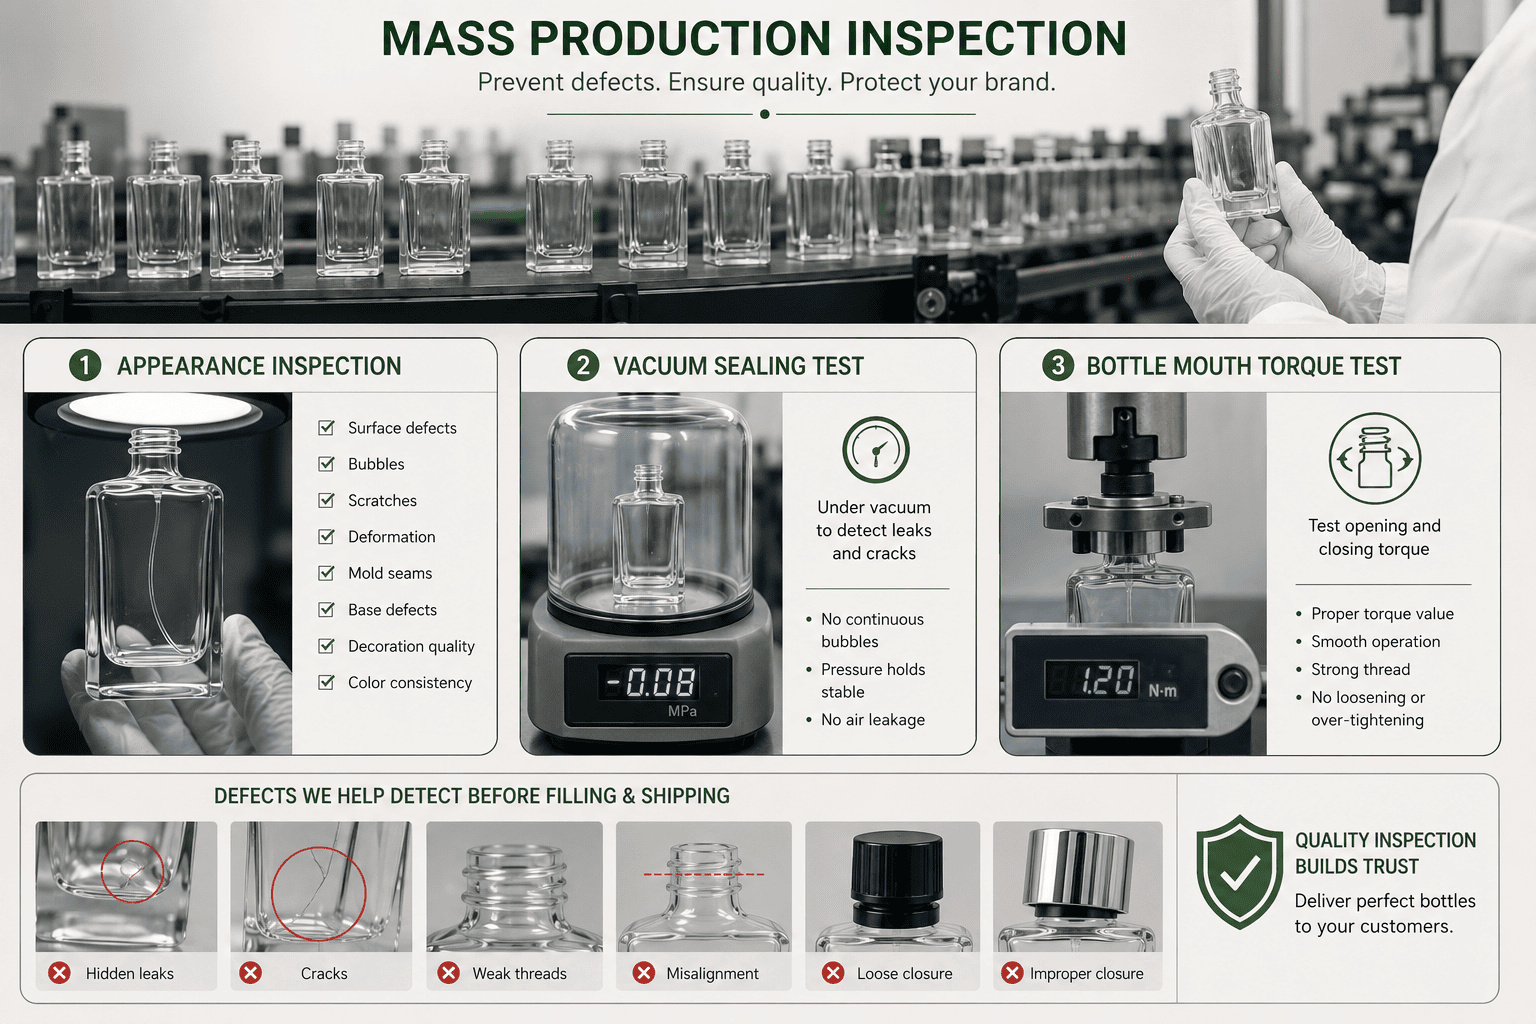
Which tests should be completed after mass production?
Many beginners inspect only obvious defects.
They check whether the bottle is broken, whether there are large black spots, and whether the bottle looks straight.
This is not enough for a custom glass bottle.
A professional mass production inspection should include both appearance standards and performance tests.
1. Detailed appearance inspection
The inspection team should check:
- Small bubbles
- Internal sand particles
- Black spots
- Dust
- Scratches
- Pits
- Uneven surfaces
- Thick mold seams
- Bottle mouth deformation
- Base deformation
Premium perfume packaging often needs a stricter visual standard than ordinary containers.
2. Vacuum sealing test
A vacuum test helps check the sealing performance of the bottle system.
It can reveal invisible pinholes, small cracks, weak sealing points, and leakage risks.
Without this test, a bottle may pass visual inspection but leak after filling.
Leakage can damage:
- The perfume formula
- The label
- The paper box
- Other products in the shipping carton
- The customer experience
3. Bottle mouth torque test
For screw-neck bottles, the factory should test the strength and torque performance of the bottle mouth.
| Torque Risk | Possible Result |
|---|---|
| Torque is too low | The cap may loosen and leak |
| Torque is too high | The customer may struggle to open it |
| Bottle mouth is weak | The neck may crack or chip |
| Thread is unstable | The cap may slip during transport |
The torque test also helps confirm whether the closure and bottle thread work together correctly.
In my experience, visual inspection tells us how the bottle looks. Performance testing tells us whether the bottle can safely perform its job.
A custom bottle should pass both.
Pitfall 8: Do Beginners Choose the Lowest Quotation Instead of the Right Partner?
A low quotation may look attractive at the beginning. However, hidden rework, delays, mismatched parts, and poor quality can make it the most expensive option.
Brands should compare suppliers by technical ability, testing process, quality control, communication, and mass production stability. The lowest quotation does not always create the lowest total project cost.
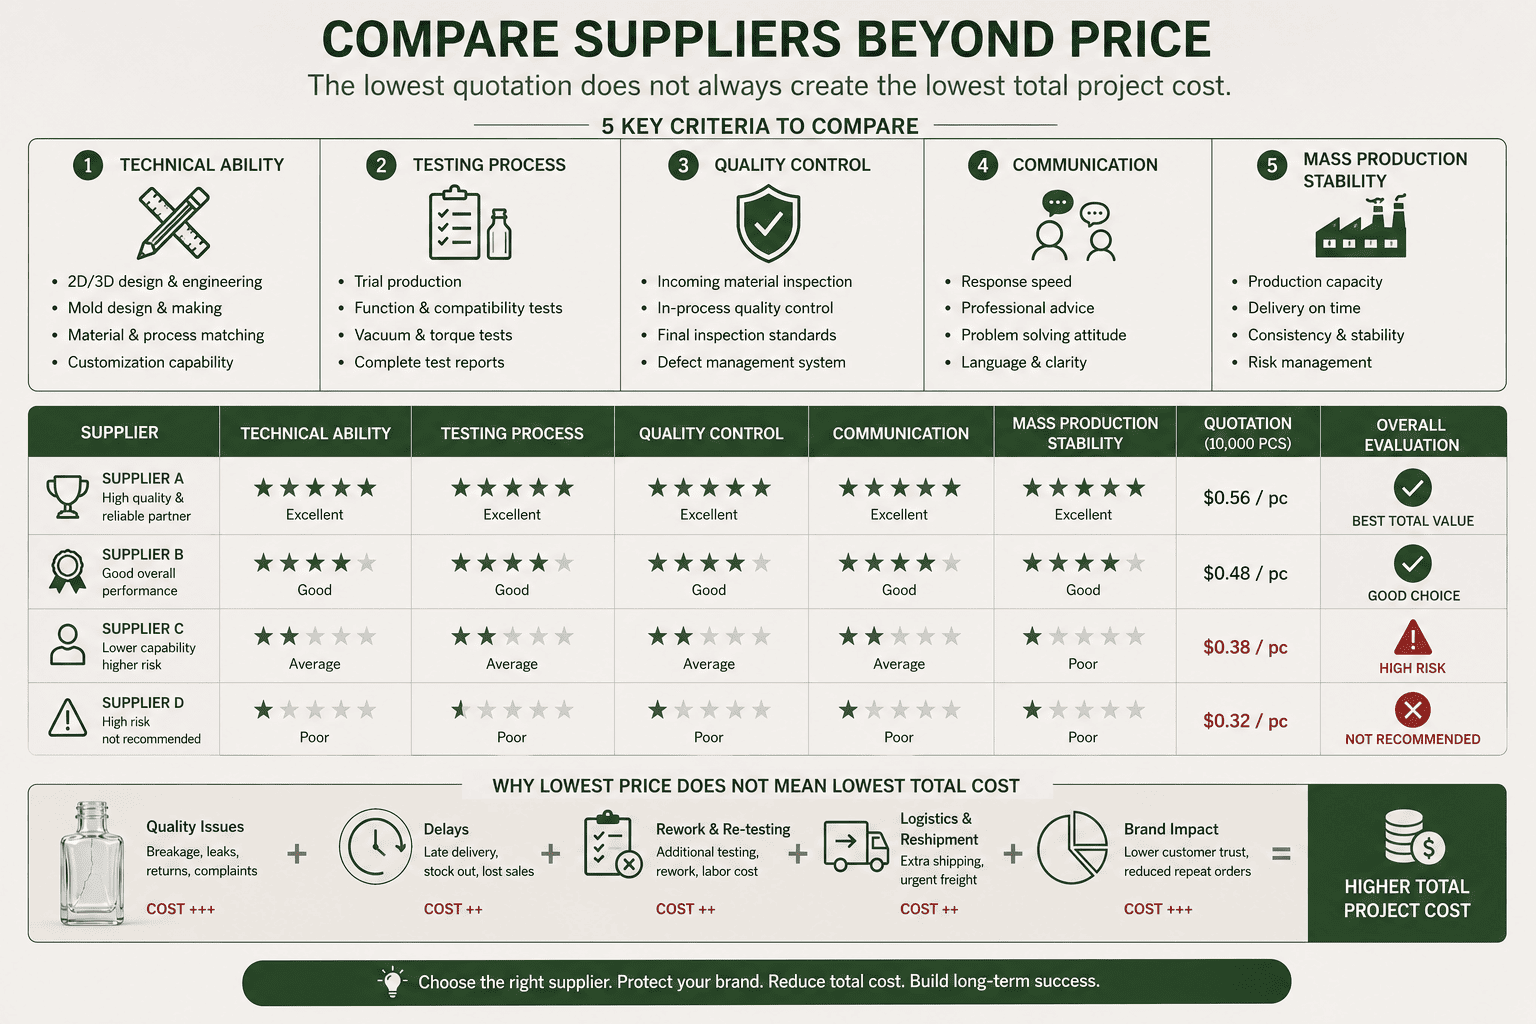
What is the real cost of custom bottle development?
Many beginners compare only the mold fee and unit price.
These numbers are important, but they do not show the full cost of the project.
A supplier with a lower quotation may skip 3D verification, machine trials, strong-light inspection, packaging testing, or performance testing.
The initial price is lower. The later risk is higher.
| Hidden Cost | Business Impact |
|---|---|
| Mold rework | Extra development cost |
| Complete mold remake | Major budget loss |
| Production defects | High waste rate |
| Packaging mismatch | New trays or boxes |
| Surface quality problems | Rework or rejected goods |
| Delivery delay | Missed launch date |
| Leakage complaints | Returns and brand damage |
I believe the most expensive part of custom molding is not always the mold.
The most expensive costs are often:
- Rework
- Mass production waste
- Customer complaints
- Replacement shipments
- Lost selling time
- Delayed product launches
A professional supplier should help the brand prevent these costs.
The supplier should provide a clear process:
| Stage | Professional Control |
|---|---|
| Design | 2D and 3D verification |
| Prototype | Physical 3D sample |
| Engineering | Material and machine matching |
| Mold | Steel mold development |
| Trial | Machine trial and strong-light inspection |
| Packaging | Full component compatibility test |
| Production | Approved sample control |
| Final inspection | Appearance and performance testing |
At Hongyan Glass Bottle, we do not only manufacture glass perfume bottles.
We help perfume brands reduce development risks before mass production.
Our role includes mold evaluation, 3D sampling, glass material selection, machine matching, packaging compatibility, surface decoration, and quality control.
The cheapest quotation can become the most expensive project.
The right manufacturing partner helps prevent expensive mistakes before they happen.
Why Is Mold Development Only One Part of the Project?
Many beginners believe the project is almost complete after the steel mold is finished. In reality, several important stages still remain.
A successful custom bottle project requires equal attention to design, sampling, testing, mass production, and quality control. The mold creates the shape, but the complete process creates a reliable product.
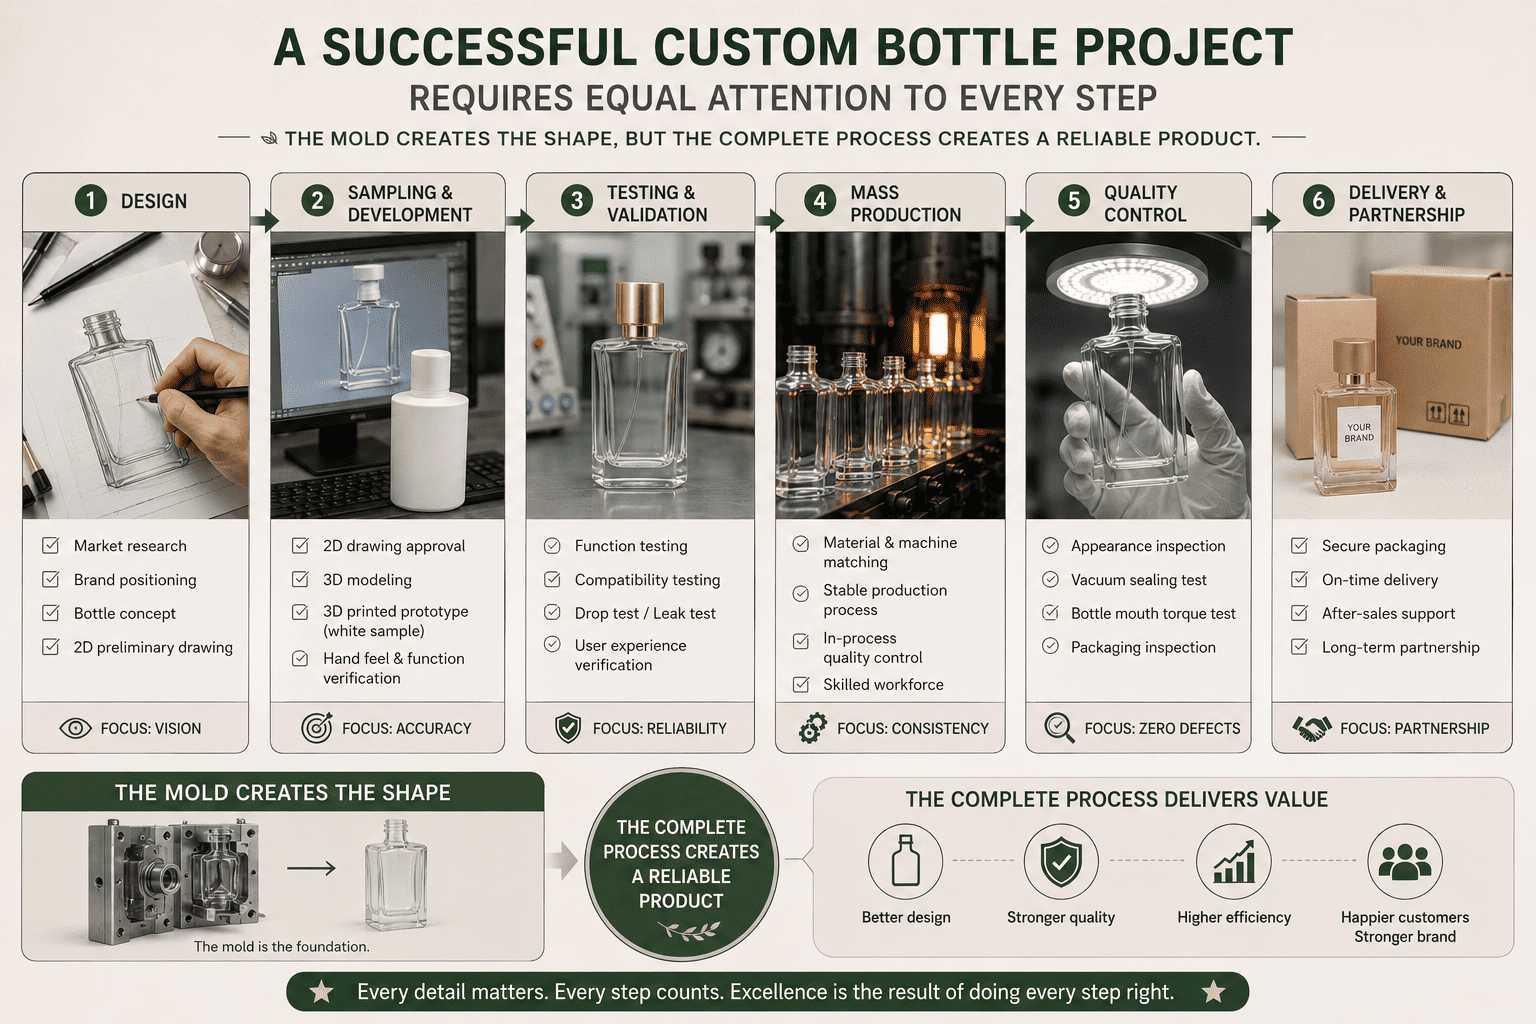
My view of the complete development process
I often explain the project with a simple structure.
| Development Area | Suggested Attention |
|---|---|
| Mold development | 20% |
| Sampling | 20% |
| Testing | 20% |
| Mass production | 20% |
| Quality control | 20% |
These percentages are not a strict cost formula.
They show that no single stage should receive all the attention.
A beautiful mold can still produce unstable bottles if the machine, material, and forming process are not suitable.
A perfect sample can still lead to disappointing mass production if the supplier does not follow the approved standard.
A beautiful bottle can still fail in the market if the cap, pump, inner tray, and box do not match.
This is why I believe custom glass bottle development should follow a complete control loop:
Market validation → 2D drawing → 3D modeling → 3D prototype → material and machine selection → steel mold → machine trial → strong-light inspection → packaging matching → mass production → performance testing
At Hongyan Glass Bottle, our mission is to provide practical and cost-effective packaging solutions for small and medium perfume brands.
We provide more than 500 in-stock perfume bottle designs for brands that want to launch quickly.
We also support custom mold development, 3D sampling, spraying, frosting, electroplating, decals, pumps, caps, and complete perfume packaging.
I want our customers to receive more than a bottle.
I want them to receive a packaging solution that is ready for filling, shipping, selling, and long-term brand growth.
Conclusion
Successful custom glass bottle molding depends on professional validation. I believe brands can prevent costly mistakes through 3D sampling, correct equipment, mold trials, packaging matching, and strict testing.
[[1]]: https://fillingfactory.com/blogs/private-label-cleaning-blog/what-is-packaging-compatibility-testing?srsltid=AfmBOoqgv1ZfTMfFbuHyaRqLo2XazpuU1TaM12Pje21JMK9XUOaONk1C "packaging compatibility"
[[2]]: https://www.symestic.com/en-us/what-is/production-stability "production stability"
[[3]]: https://scm-solution.com/final-quality-control-fqc/ "final quality testing"
[[4]]: https://apcpackaging.com/custom-services/private-molds/ "private mold"